Price List and Discounts
Table to Contents
- Introduction to Update Price list
- Creating new price list
a. General
b. Yachts
c. Prices - Changing existing price list
- Introduction to Update discounts
- Creating new discount
a. Name
b. Add discount
c. Priority
d. Sales action period
e. Booking period
f. Additional information
g. Exception periods
h. Conditions
g. Yacht filter - Changing existing discount
1. Introduction to Update Price list
Please note that this is a tutorial ONLY for fleet operators who use the possibility of updating the price list and discounts by themselves.
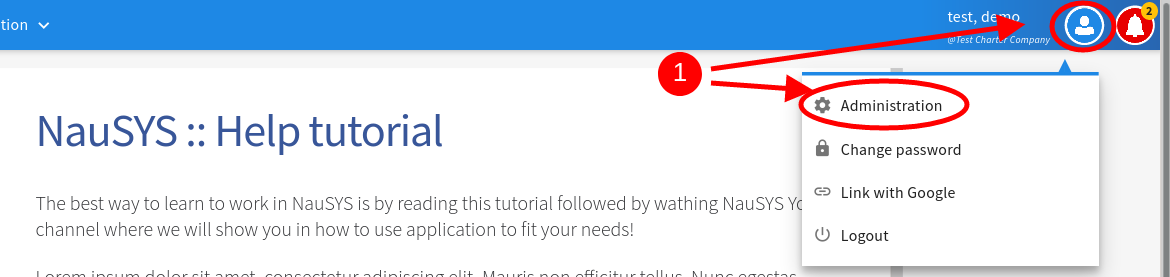
To access your price list, press User icon (1) in the top right corner of the menu bar and click on Administration (2).
From here you are able to edit or a add a new price list and discounts into your account.

Picture 1.
To open the price list, select Booking (1) from the menu bar, then proceed to click on the Bareboat (2) and choose Update Price list (3).
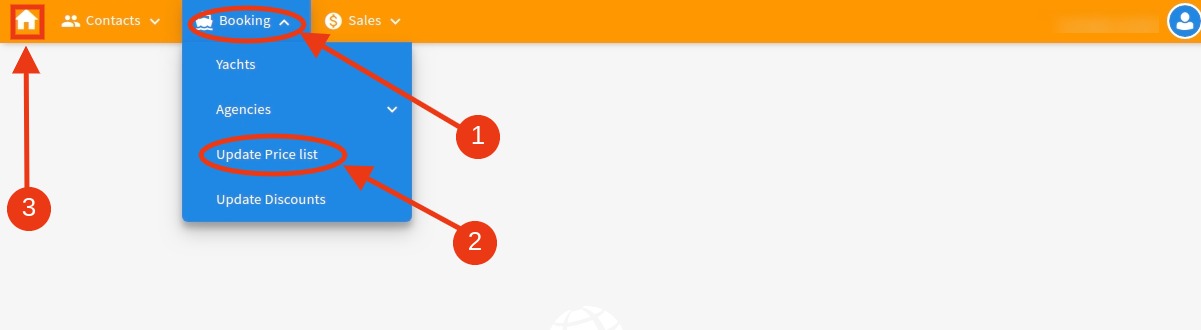
Picture 2.
If you want leave administration mode and go back to your workspace (Contacts, Client offer, etc.) click on Home button (4) in the top left corner.
After clicking on the Update price list, another window will appear looking like Picture 3.
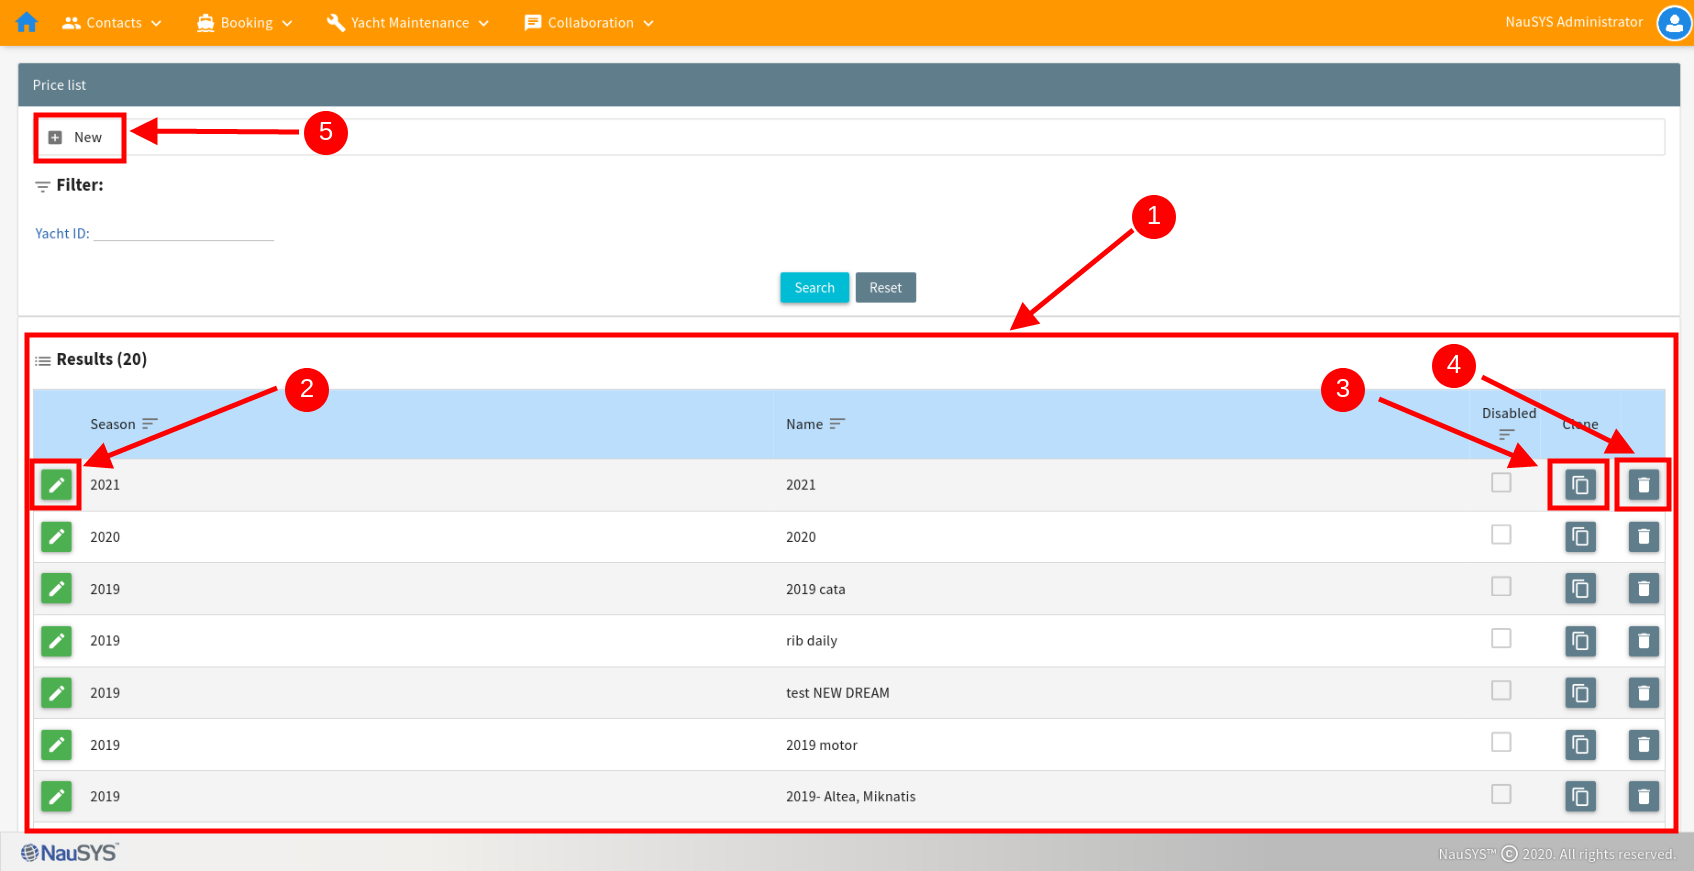
Picture 3.
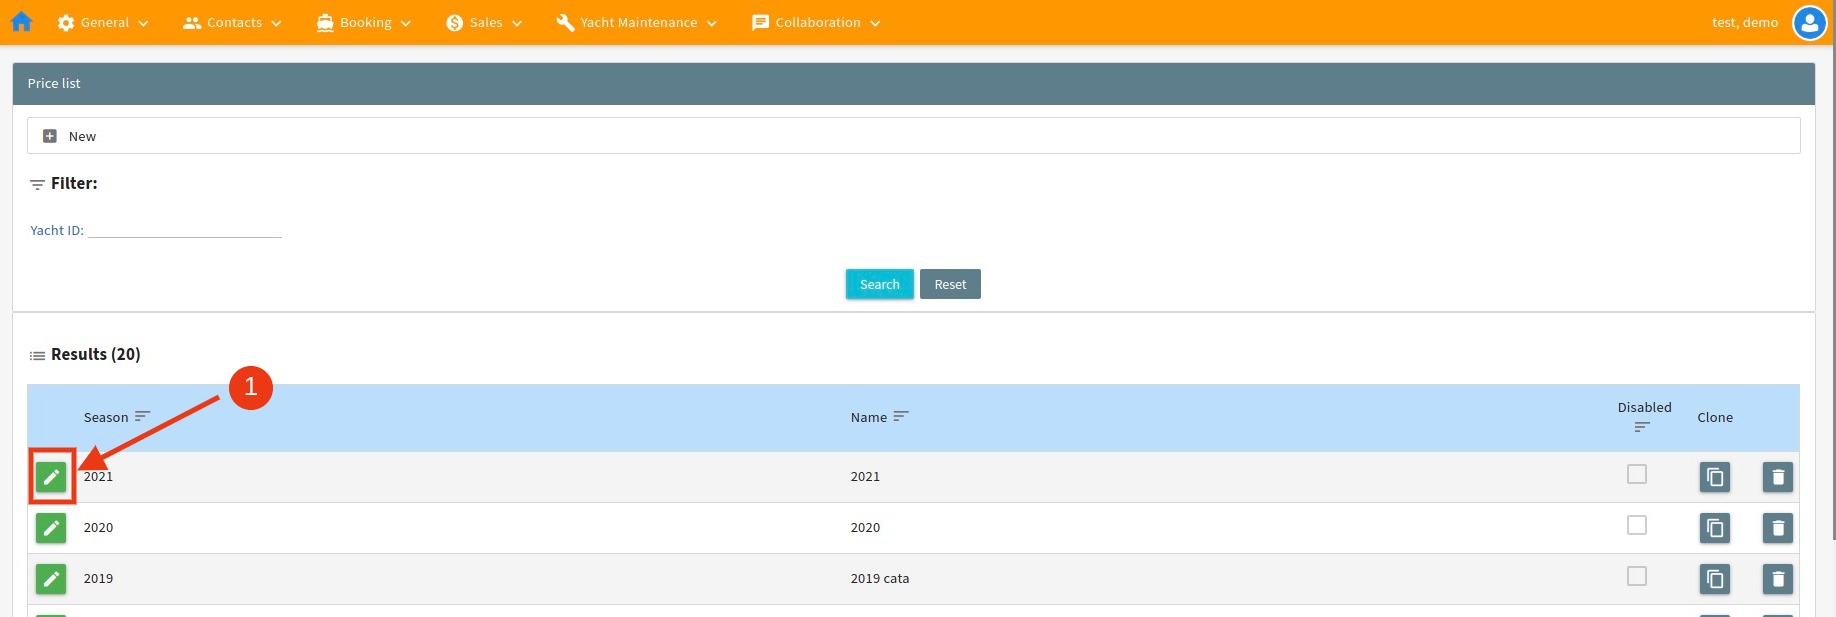
The price list window will always display all created price lists (1).
List can be sorted out by season or name of the price list.
To edit a specific price list, click on the Edit button (2).
To clone a price list, click on the Clone button (3) and to delete it, simply click on the Delete button (4).
To create a new price list, click on the New button (5).
2. Creating new price list
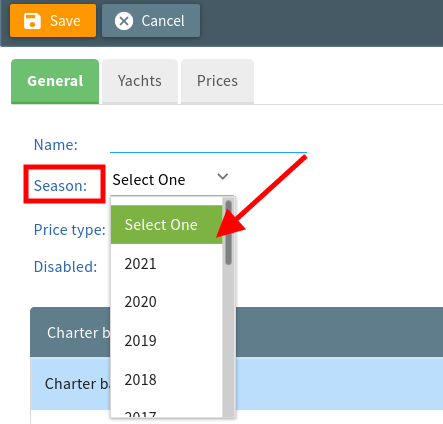
Before starting, please remember to check if the corresponding season for the price list is created in your account. You can check if the corresponding season is open while creating a price list and clicking on the Season field as presented in picture 4.
If there is no corresponding season to select, please contact NauSYS Support Team at support@nausys.com to create a new season for you.
Picture 4.
The price list dates must cover all periods in the season, which is usually 01.01.-31.12.
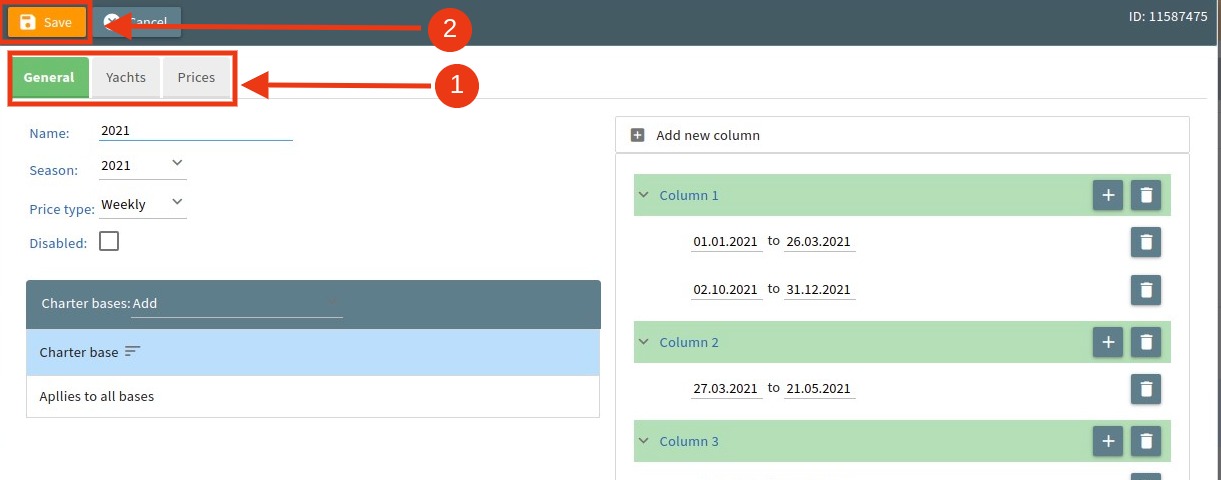
To create new price list click on the New button (5) as seen in picture 3. A new window (picture 5) will appear allowing you to set general information, include yachts and enter prices (1).
a. General
Please enter the Name of the price list (2). Usually the price list is named by the season (3) to which they refer to. This name is not visible to agents.
Select a corresponding Season and choose weekly or daily Price type (4).
To start defining the price list periods, simply click on the Add new column button (5).
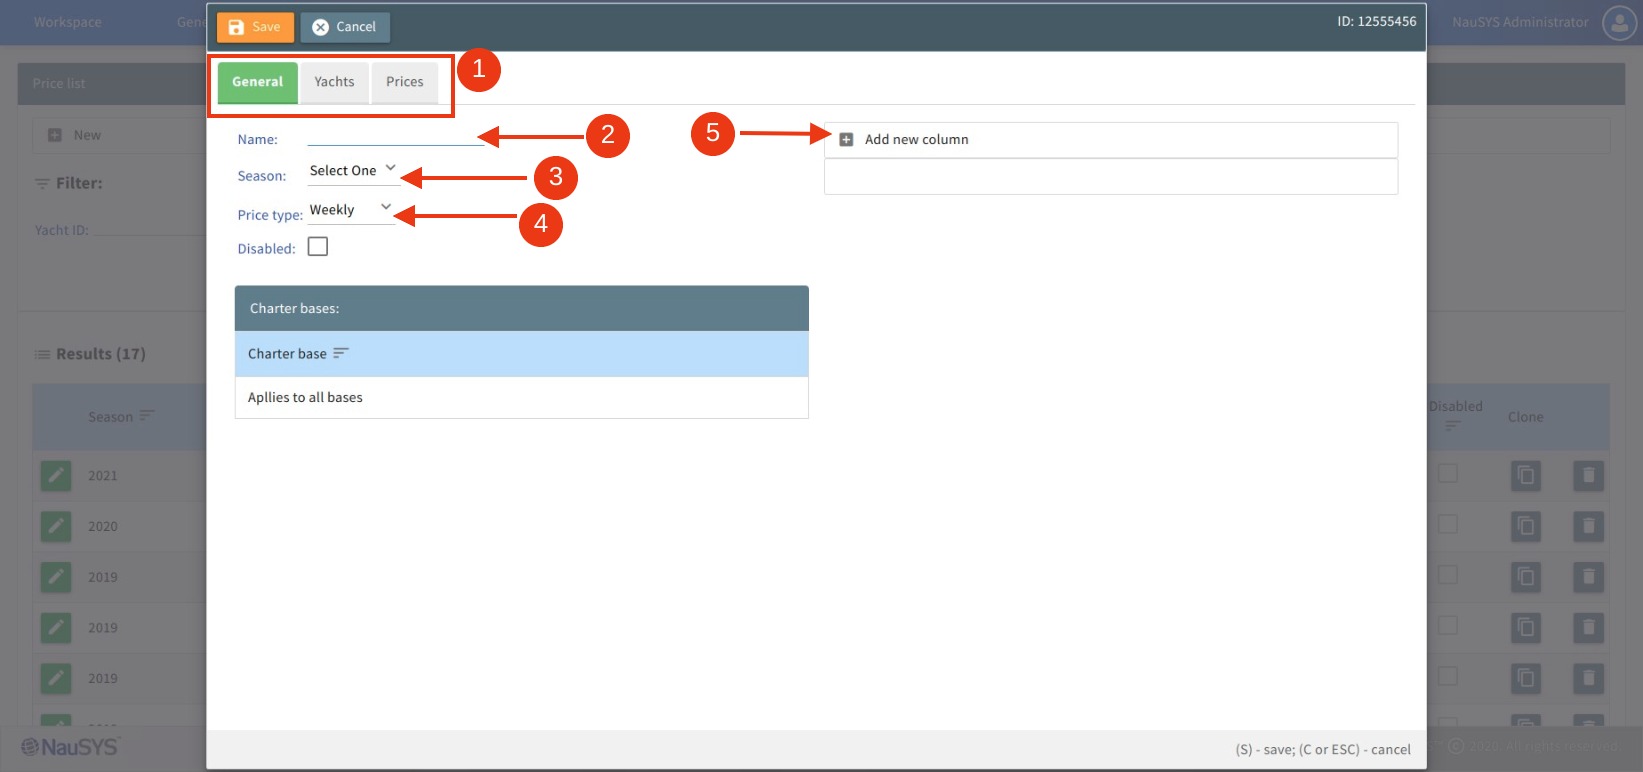
Picture 5.
When adding new columns, please remember that the price list dates must cover all periods in the season! You cannot skip day, week or month when setting start/end dates for the period.
By selecting Add new columns button (1), you are creating periods for which you will define prices (picture 6). For example, setting periods for low, medium and high season.
By clicking on the Plus icon (2) inside each column, you are setting periods which will have the same prices. For example, setting low season periods at the start and end of the year.
Please remember that dates always must start on SATURDAY and end on FRIDAY! The only exceptions to this rule are 01.01. (start of the year) and 31.12. (end of the year)!
After you are finished, you can proceed to add yachts to the price list by clicking on Yachts tab.
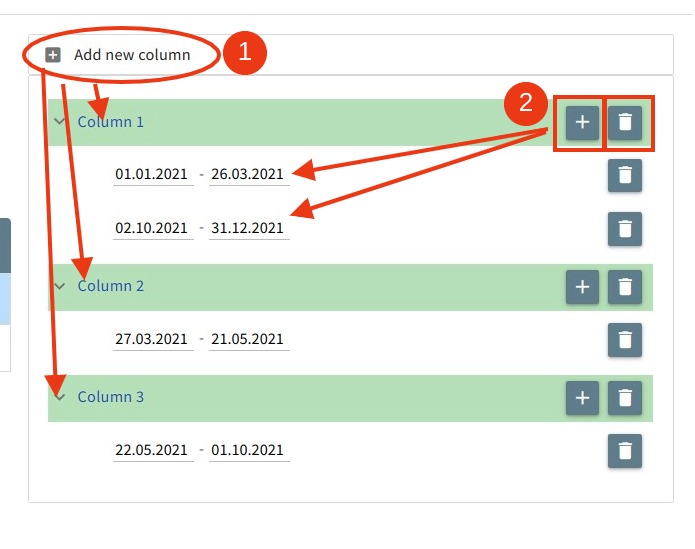
Picture 6.
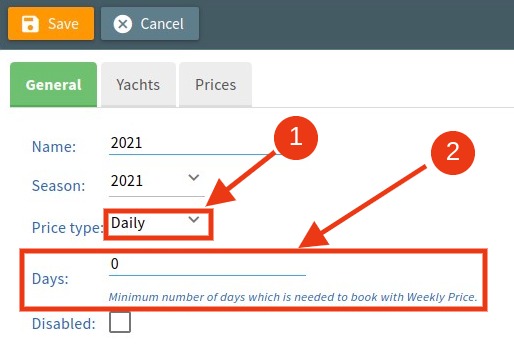
If you have selected daily Price type (1) in the General tab, Days field (2) will appear (picture 7). If you use only daily price list without possibility of weekly booking, please set the number of days to: 365
If you use both daily and weekly possibility of booking for the same yacht, in that case please put the number of nights for which price will be calculated daily.
For example, if you use daily prices only for 6 days booking, and after that you calculate weekly prices, please set the number of days to: 5
Picture 7.
b. Yachts
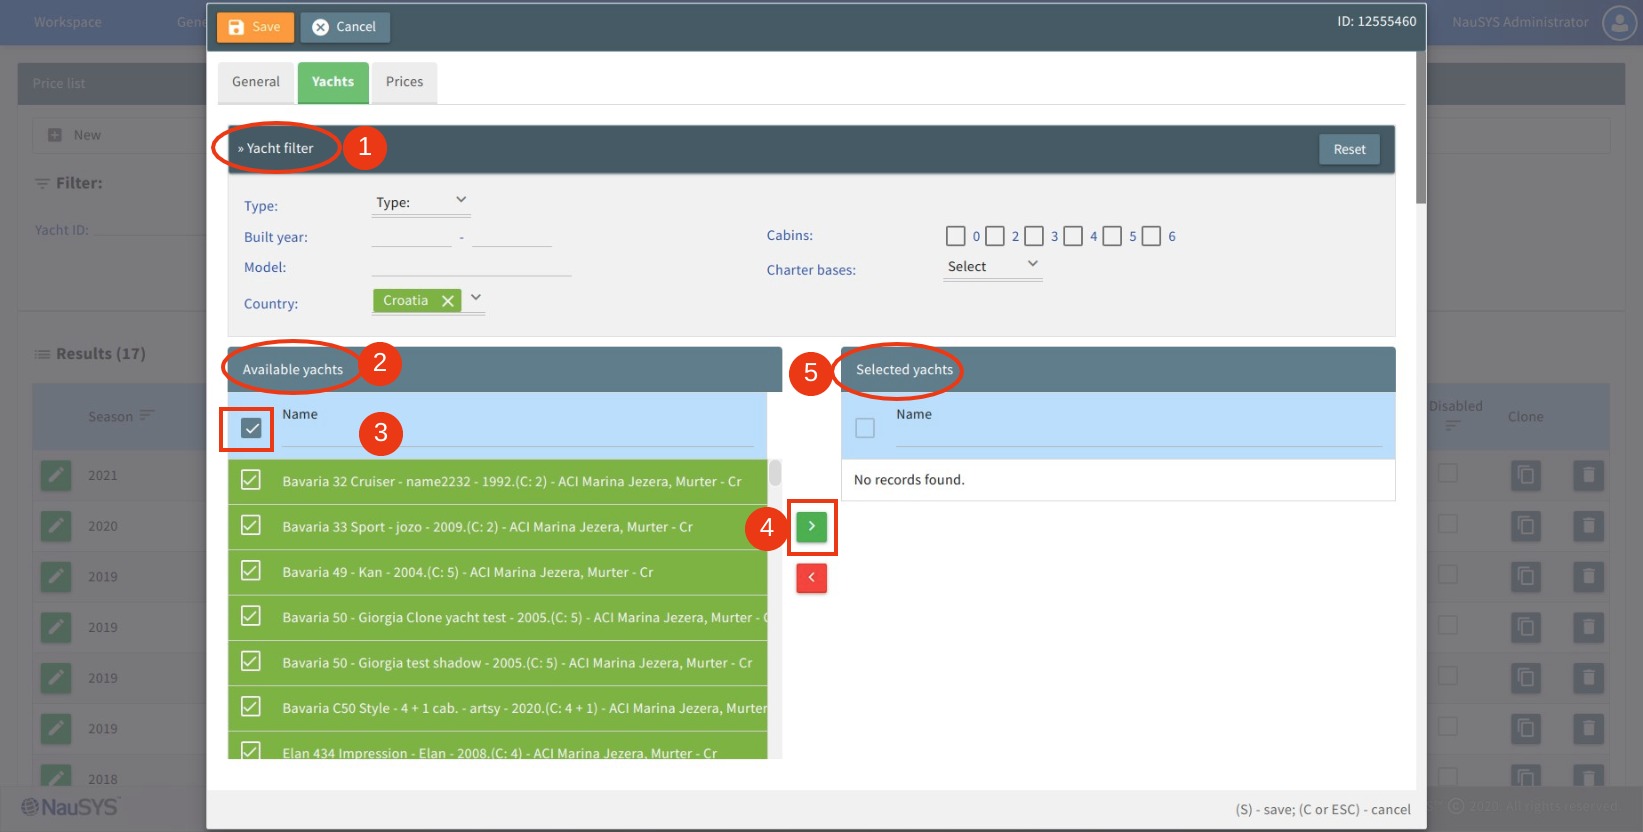
To add yachts in the price list, use Yacht filter (1) to search for needed yachts.
Simply start setting the criteria, and yachts will be shown under Available yachts section (2).
From here you can add all yachts or select specific ones in the price list. It is also possible to search for a yacht by name, model, charter base or build year (3).
Click on green arrow (4) to transfer chosen yachts to the Selected yachts section for the price list.
Picture 8.
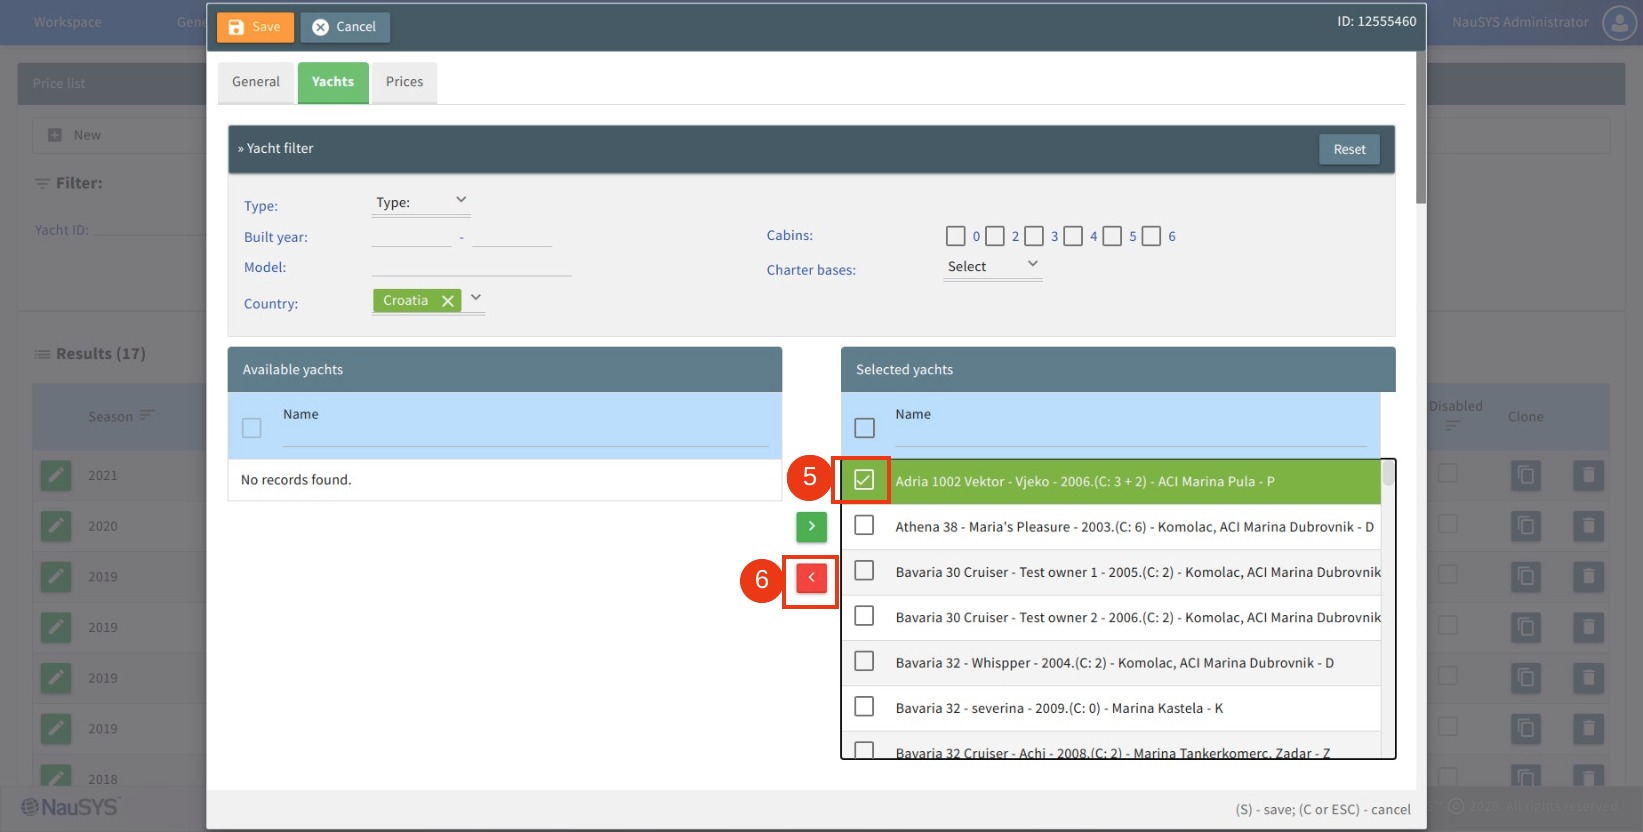
If you mistakenly added yacht to the Selected yachts, you can simply remove it from the list by clicking on the yacht (5) and on red arrow (6).
Picture 9.
After you are finished selecting yachts for the price list, you can go ahead with the final step, setting prices.
c. Prices
To enter the prices for the defined periods and yachts, please click on the Prices tab.
Please add prices without decimals. The only exception to this rule is if you indeed use prices with decimals (for example: 3150,50)
Please make sure to double check the prices once you update them. Once you are done, check all the data once again and click on the Save button.
Your price list is now created!
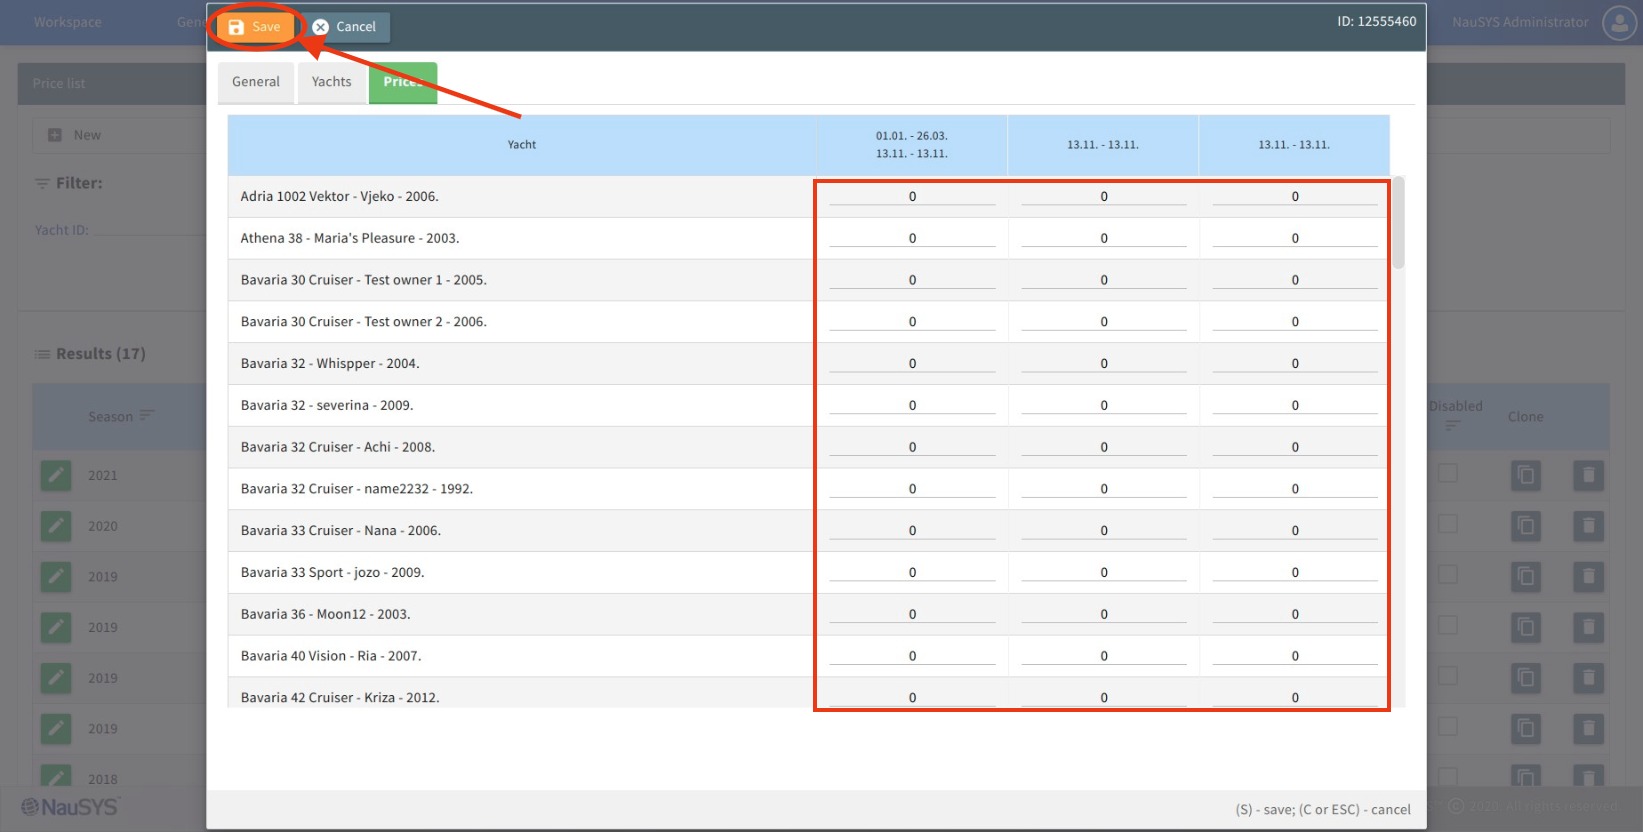
Picture 10.
3. Changing existing price list
To change prices on the price list, simply click on Edit button (1) to enter edit mode.
Picture 11.
Inside the new window you are able to change data under General, Yachts and Price section (1).
When you are finished making changes, click on the Save button (2).
 Picture 12.
4. Introduction to Update discounts
To open discounts you have to access administration mode by clicking User icon (1) in the top right corner of the menu bar and selecting Administration (1).
Picture 13.
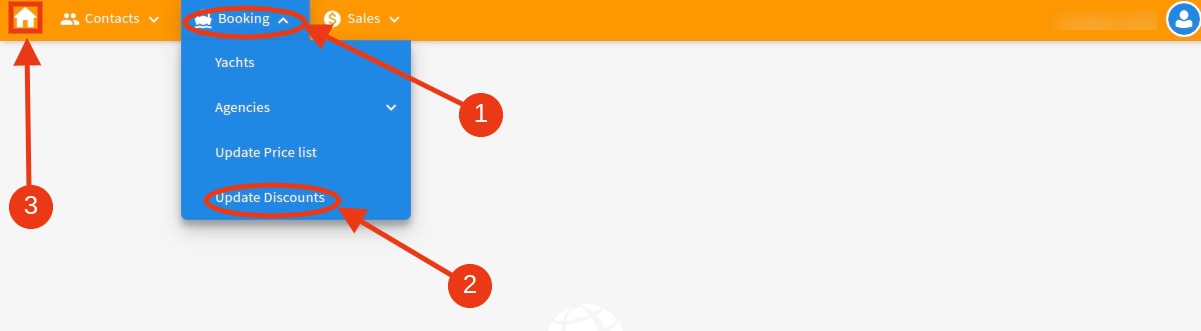
Select Booking (1) from the menu bar, then proceed to click on the Update discounts (2).
If you want to leave administration mode and go back to your workspace (Contacts, Client offer, etc.) click on Home icon (3) in the top left corner.
Picture 14.
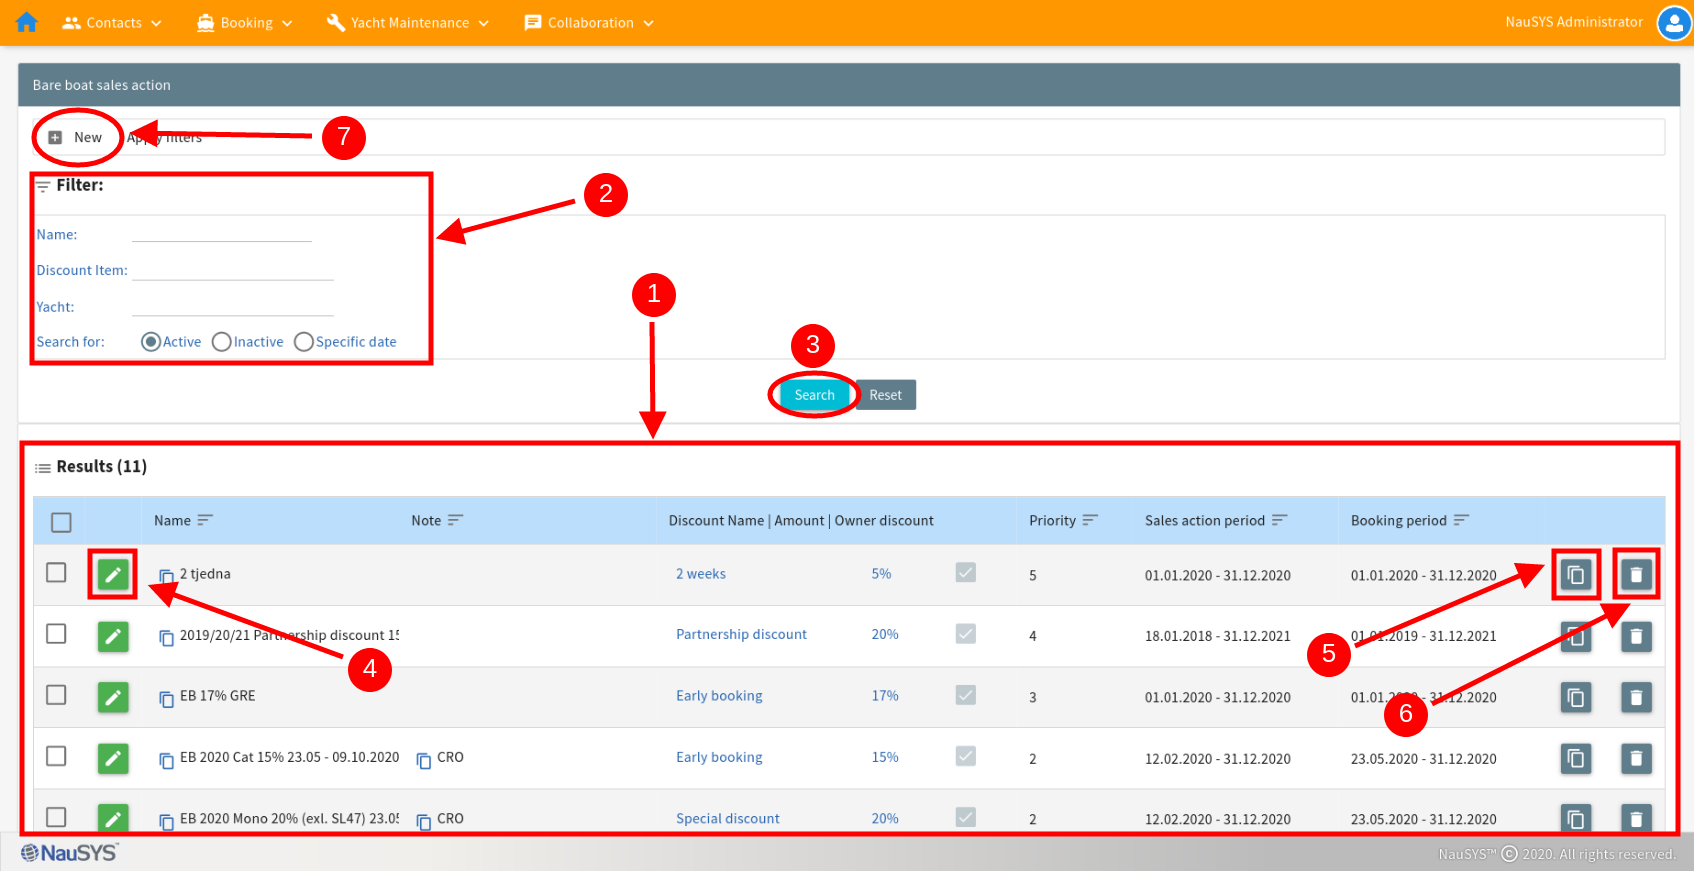
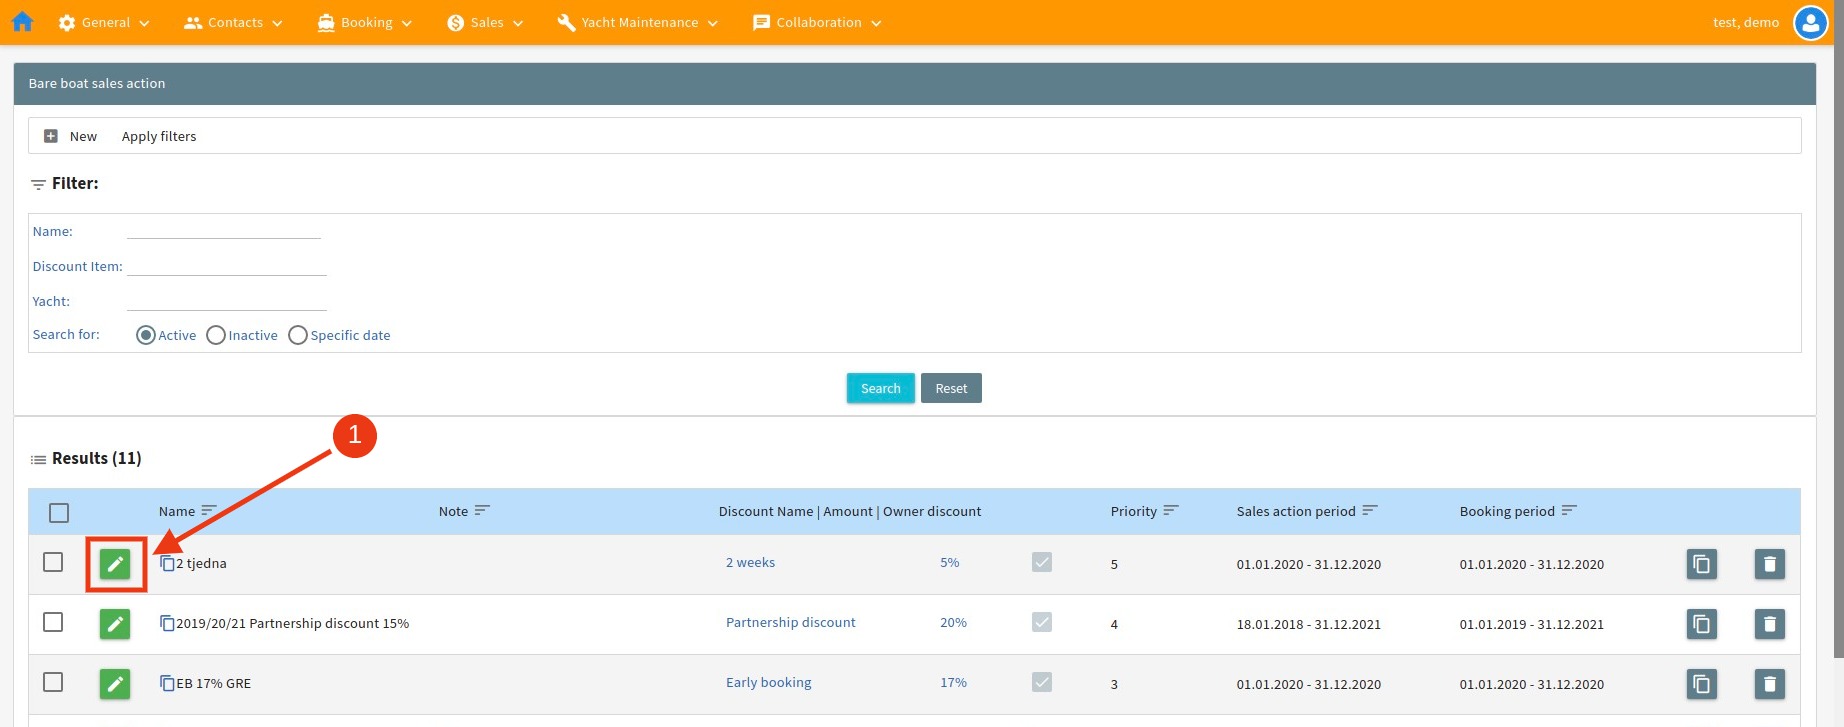
Inside discounts window, list of all active discounts will be displayed (1). It is possible to sort discounts by name, note, priority, sales action period and booking period.
If you need to search for specific discount, use Filter (2) and click Search (3). It is possible to filter by discount name or by yacht.
To edit existing discount, click on Edit button (4) to enter edit mode.
To clone a discount, click on Clone button (5) and to delete an existing discount, simply click on Delete button (6).
To create new discount, simply click on the New button (7).
Picture 15.
5. Creating new discount
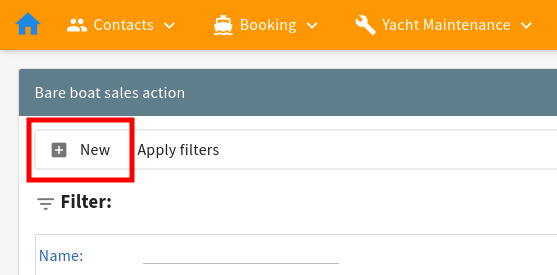
To create new discount, please click on the New button.
Picture 16.
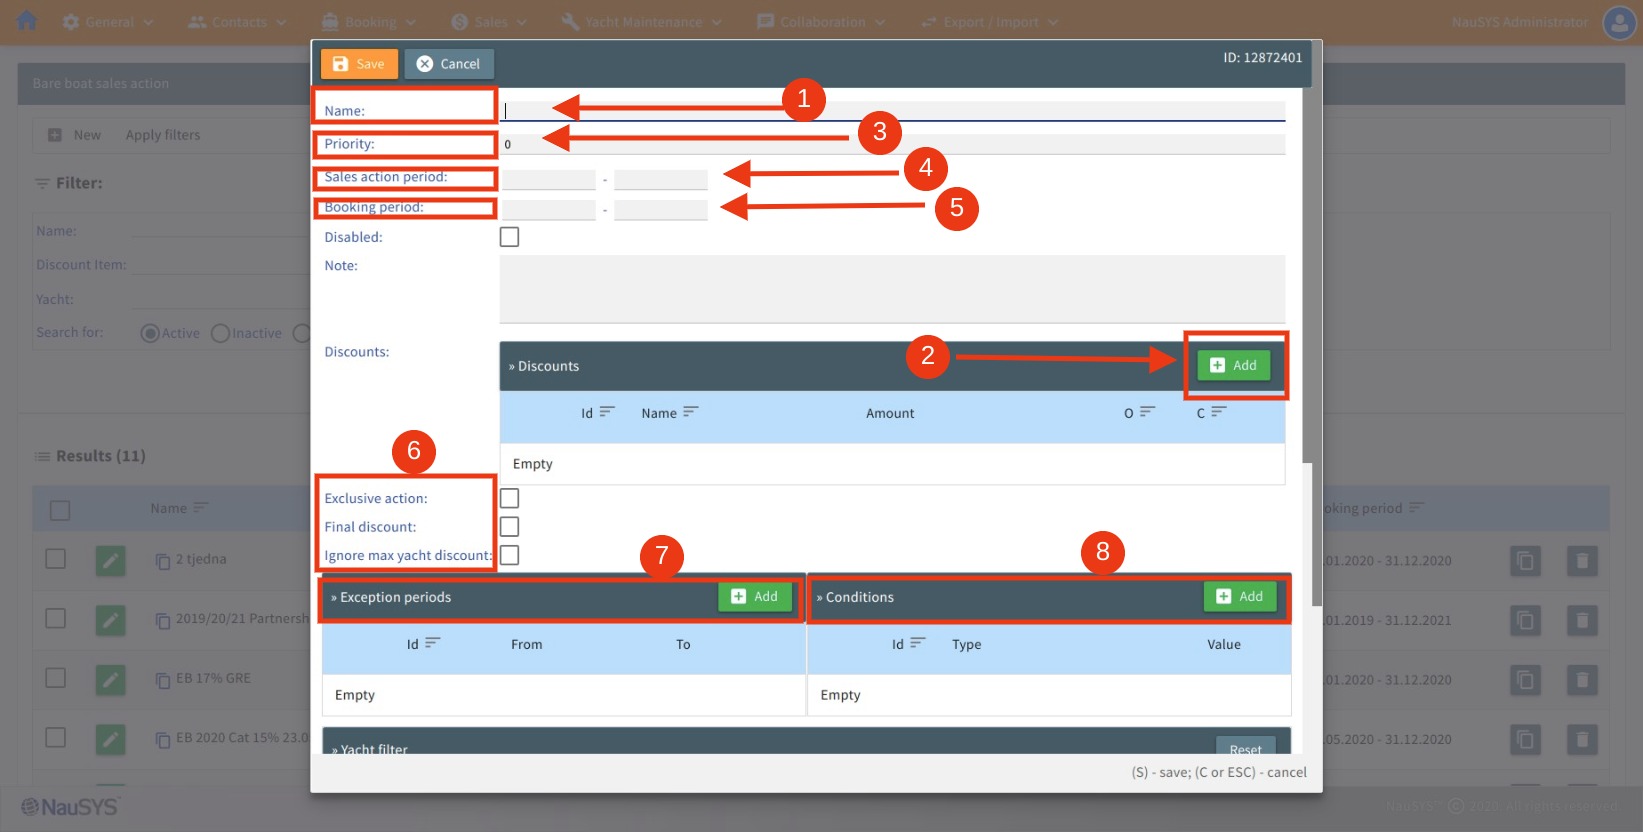
A new window will appear in which you must fill in and set possible data for your discount.
Picture 17.
Please follow the next steps to properly create discount as seen in picture 17 and 20:
a. Name
Inside Name write the name of the discount. This name will only be visible to you and helps you find this discount if you have multiple active discounts.
b. Add discount
Click on the Add button to select discount you need. Another window will appear as in Picture 17. Inside this window choose a Discount item, set Type and fill in Amount (% or EUR) you are giving for this discount. If you are using Distribution package leave the Owner discount box checked!
Click Save button to resume creating a discount.
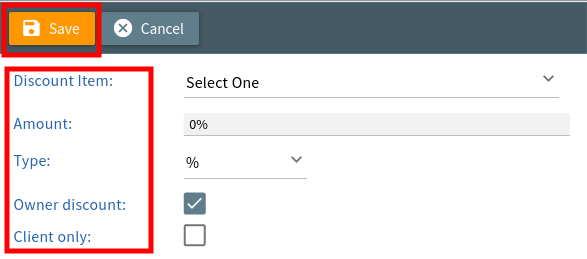
Picture 18.
c. Priority
Inside this field leave the number 0, if you have no existing discounts yet.
Only put higher number (1, 2, 3, etc.) if you are creating a new discount but you have other discounts applied for the same boats and same period. The discount with higher priority number will be always added before any other discounts to the yachts.
d. Sales action period
Set the period when the sales action is valid. This is the period during which agents can book with this discount. The start/end period can be set to any date of the year.
e. Booking period
Set the period in which the discount is applicable.
Please remember that dates always must start on SATURDAY and end on FRIDAY! The only exceptions to this rule are 01.01. (start of the year) and 31.12. (end of the year)!
f. Additional information
Exclusive action in combination with Priority means that this discount will be the only one applied to the yacht and for that specific period.
If Ignore max yacht discount is checked, this means that the discount can be bigger than the maximum yacht discount.
g. Exception periods
If needed, you can set booking periods in which discount is not applicable by clicking on the Add button and choosing the exact booking period. Please remember that dates must start on SATURDAY and end on FRIDAY!
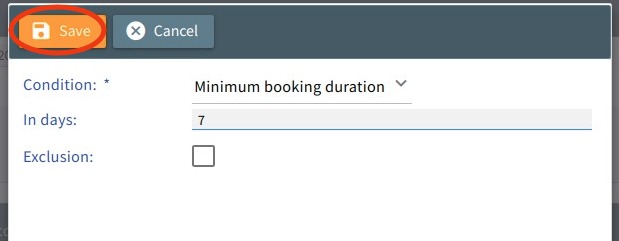
h. Conditions
Please remember to always set a condition for the discount. By clicking the Add button, a new window will be displayed allowing you to choose a condition and it’s value. Please see Picture 19.
The most common and important condition is Minimum booking duration. With this condition set, the discount will not be applied on the charters that last less than 7 days. While setting the minimum booking duration always enter the number 7 and click Save to resume creating discount.
Picture 19.
i. Yacht filter
Use Yacht filter to search for yachts to which the discount will be applied. Start setting the criteria and yachts will be automatically shown under Available yachts section (10). Please see Picture 19 for reference.
Select wanted yachts and click on green arrow to transfer yachts to the Selected yachts (11). To remove yachts from Selected yachts (12), you can simply choose unwanted yachts and click on red arrow . If you do not choose any yachts, the discount will be applied to all yachts.
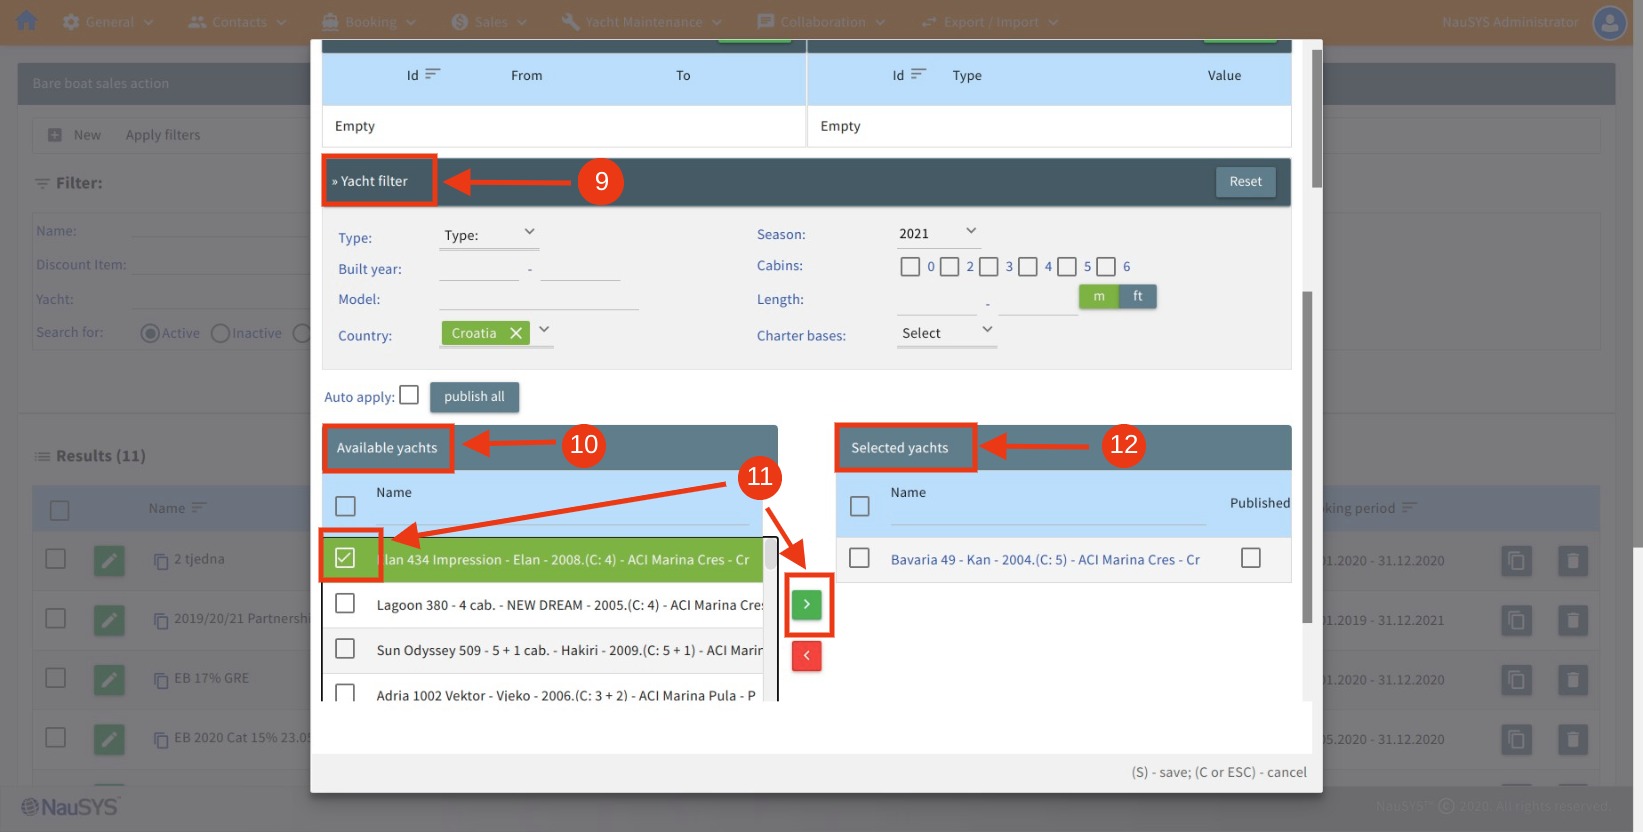
Picture 20.
After you are done, please check the data again and click on the Save button to finish creating the discount.
6. Changing existing discount
In order to change discounts, search for desired discount and click on Edit button (1) beside the discount name to enter edit mode.
 Picture 21.
Inside a new window you can alter any information to the existing discount as seen in Picture 22. When you are done please click the Save button (1) to save made changes.
To discard all progress and go back to the discounts list, simply select Cancel button (2)
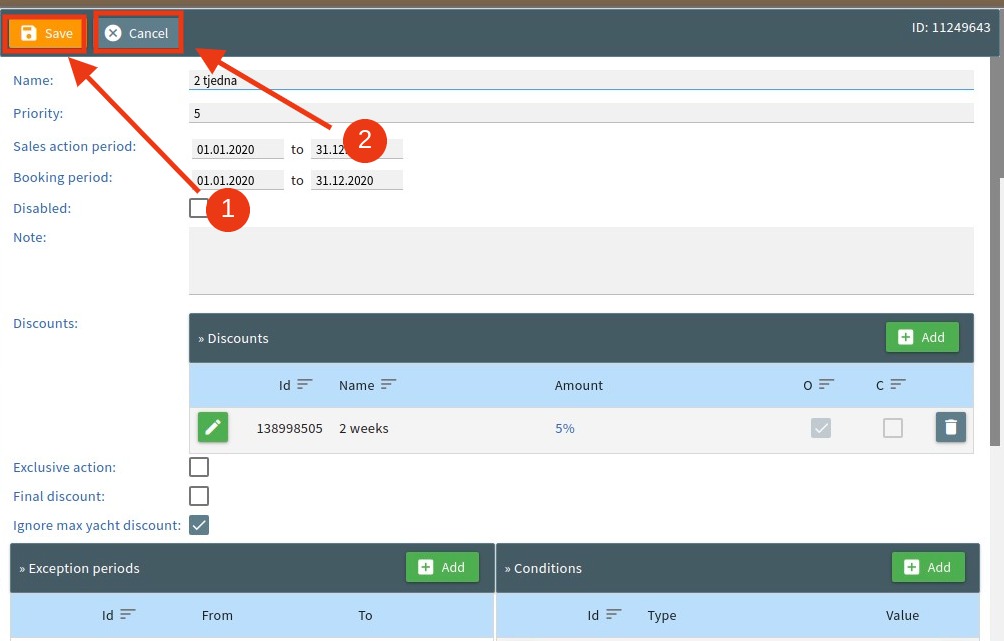
Picture 22.