Booking list
After logging in to the system, you will be presented with the initial screen (picture 1).
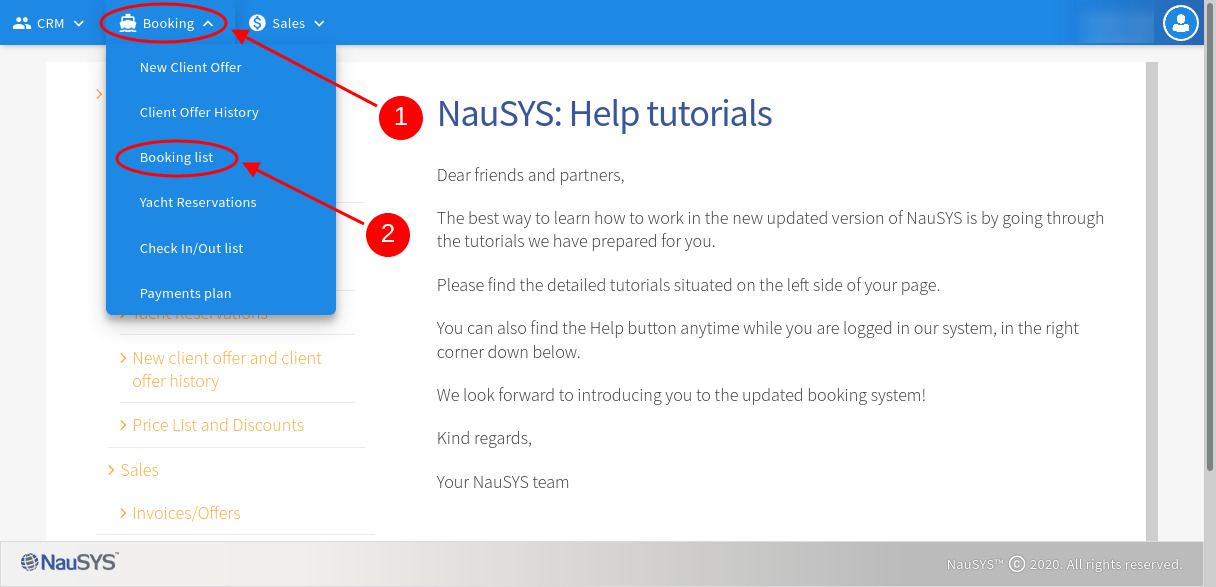
Picture 1.
To access the Booking list, please select the Booking menu (1), and then the Booking list (2) menu item.
Once selected, the Booking list filter will load (picture 2), which will enable you to filter boats displayed on the booking list.
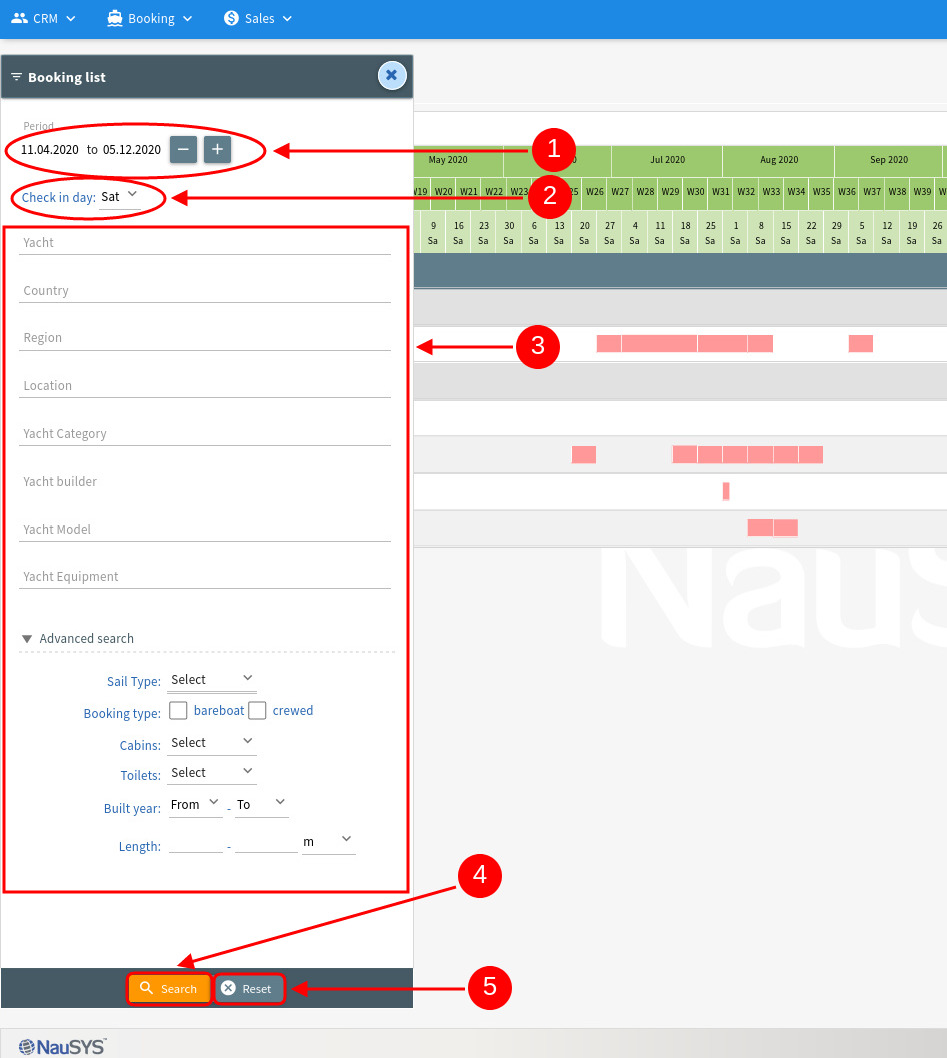
Picture 2.
Period (1) – defines the period to be displayed on the Booking list
Check-in day (2) – defines the check-in day for the boats
Other miscellaneous criteria (3) will allow you to narrow down the boats you want displayed by given criteria.
If you wish to enter the booking list straight away, simply click the Search button (4) when the filter opens, otherwise set the filter criteria and then click Search to apply. To reset the filter to default state, click the Reset button (5).
Once the Search button is clicked, the Booking list (picture 3) will be displayed.
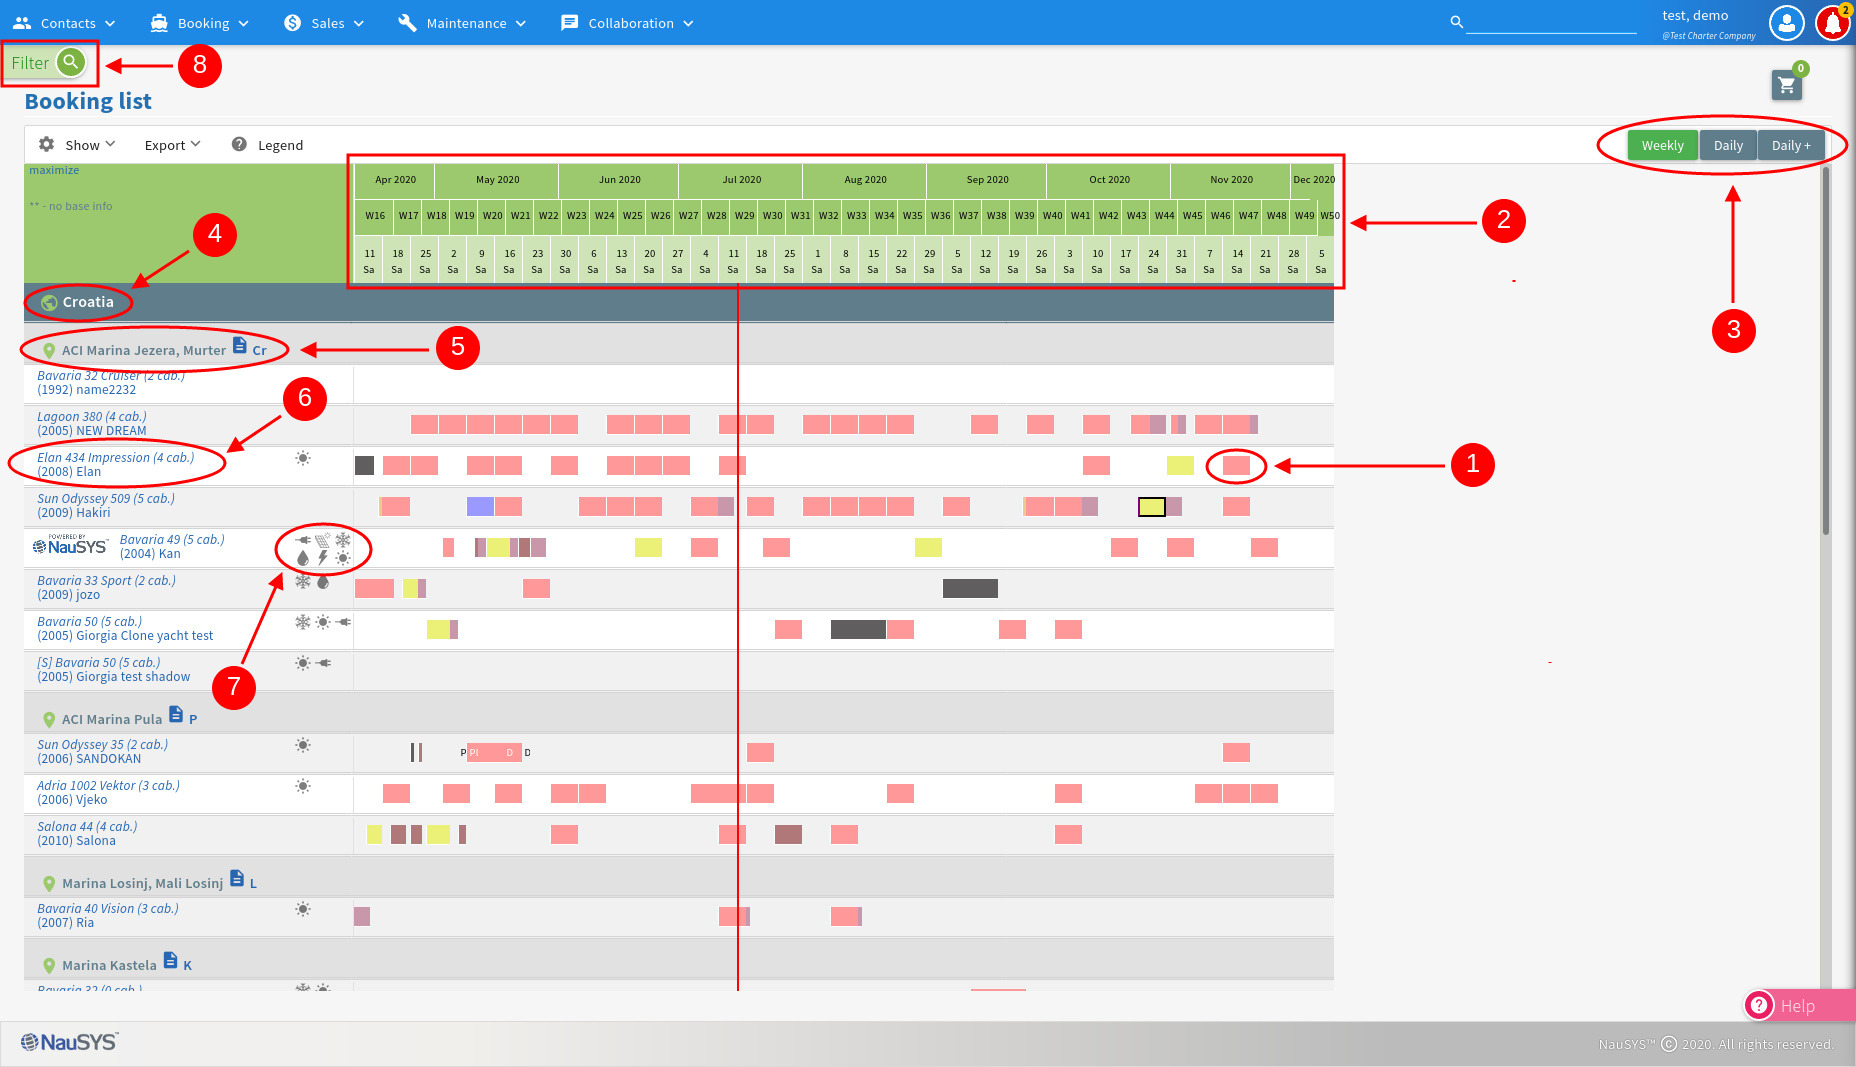
Picture 3.
The Booking list is divided into sections/squares (1) which mark the reservation period.
The time period for each square is noted at the top of the Booking list (2). Month, number of the week in the year, and the date with the check-in day can be seen here.
The time period displayed for the squares can be customized by selecting one of the customization buttons at the top right corner (3). Weekly, Daily or Daily+ can be selected.
Daily+ allows for a more condensed display of the available periods.
Boat information can be seen in the left column and is grouped by default by Country (4), then Charter base (5), and lastly boat models (6).
By clicking on the boat name (6), a new tab opens up in the browser containing information about the selected boat (i.e. equipment, photos, extras…).
The icons (7) to the right of the boats name shows some of the most important pieces of equipment the boat has. Simply hover the mouse over an icon to get the icon description.
Boats to be displayed on the booking list can always be customized by going back to the Filter (8) and adjusting the filter criteria.
Each square on the Booking list is color coded depending on the status of the reservation. The meaning of each color for each square can be seen by clicking the Legend (1) button (Picture 4).
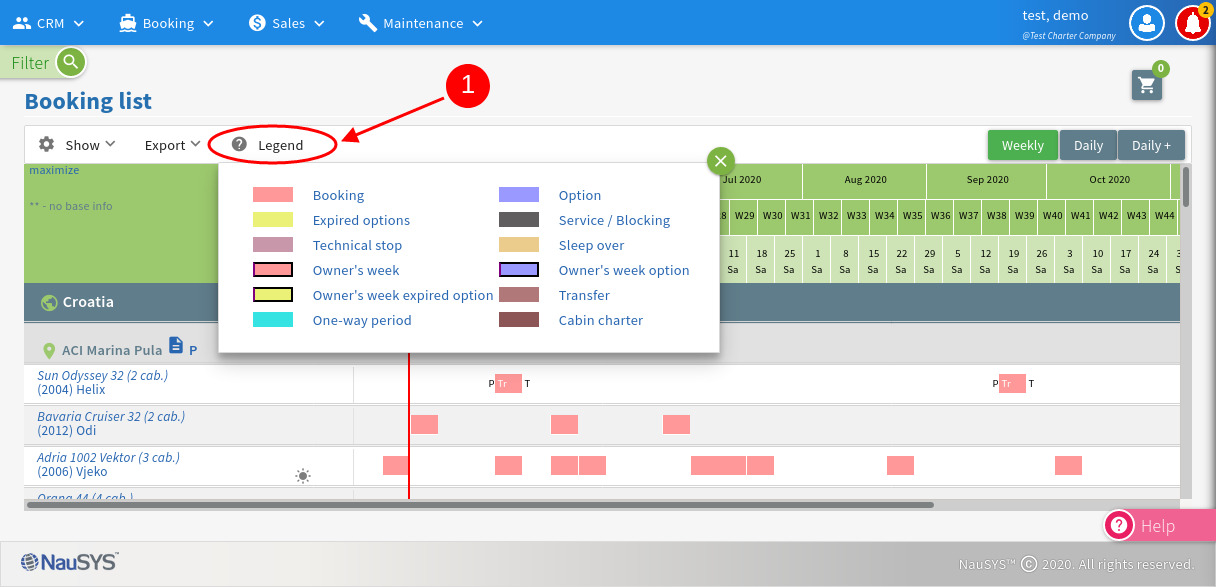
Picture 4.
By clicking on a square, additional information about the chosen booking period can be seen (picture 5). To see more details about the chosen booking period, simply enter by clicking the Fetch button (1).
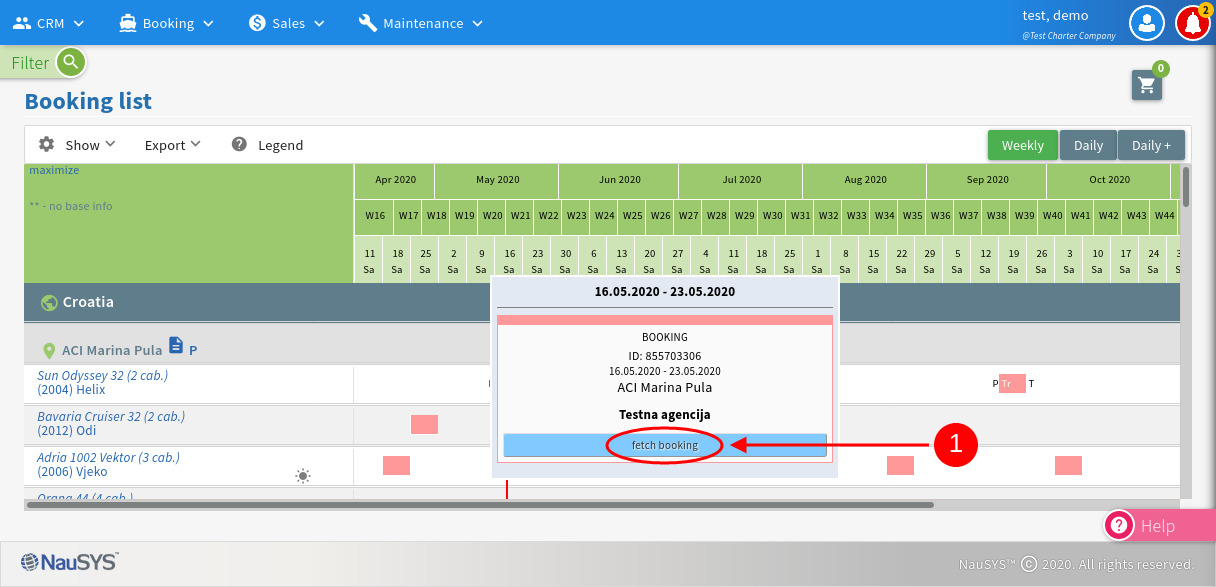
Picture 5.
Payment status of bookings can be seen by clicking on the Show menu (1) in the top left corner (picture 6), and then selecting the Show paid status (2) menu item.
Squares will now be color coded depending on their payment status, and the color meaning can once again be seen by clicking the Legend button (3).

Picture 6.
Creating Info / Option / Booking
Creating an Info/Option/Booking on the Booking list starts by selecting an available boat period (picture 7), and then choosing the desired number of weeks / days.
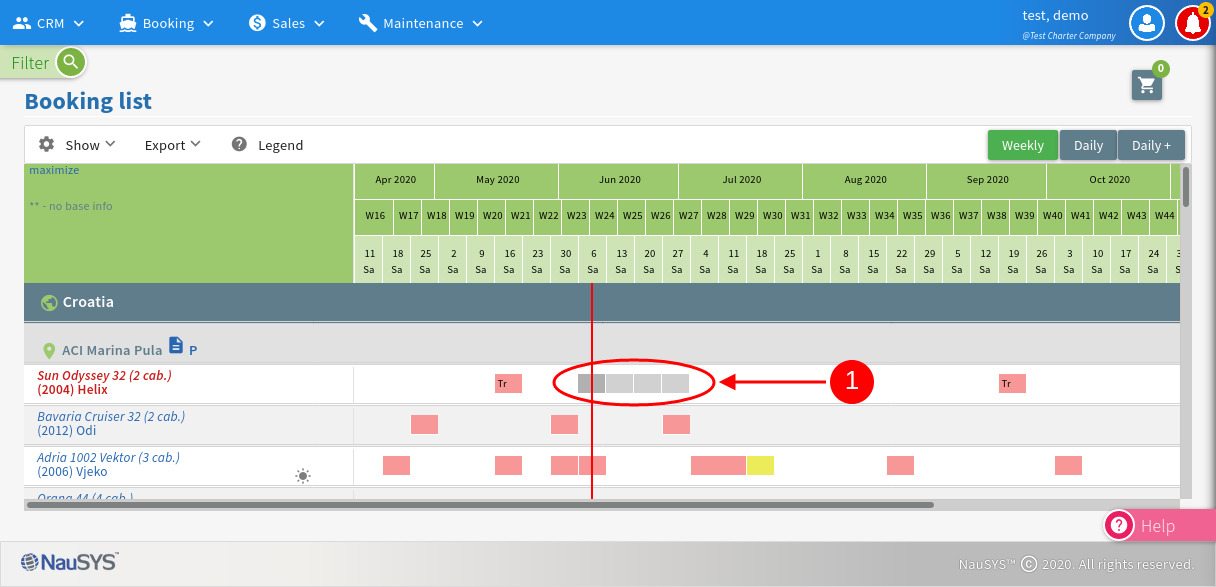
Picture 7.
This will open up an info dialog box with the basic information (picture 8), where you can opt to create an offer or an option directly (2).
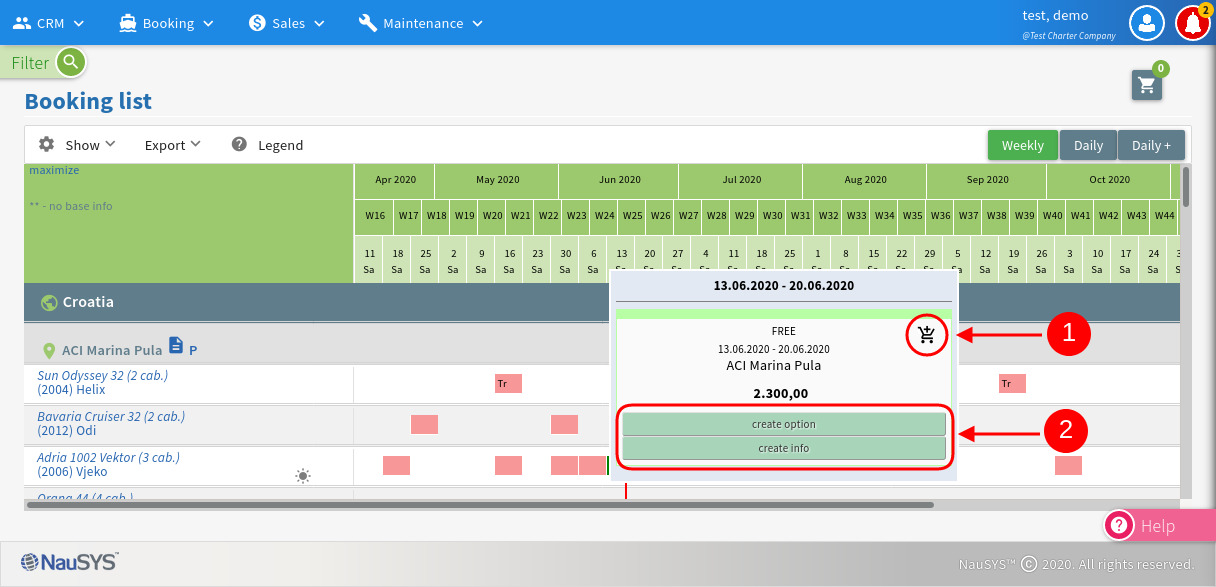
Picture 8.
If you choose to add multiple boats to an offer, this can be done by clicking on the Shopping cart icon (1) in the info dialog. This will add the boat to the offer (picture 9), which will be visible by the Offer indicator at the top right corner (1). To add more boats, just repeat the procedure for subsequent boats.
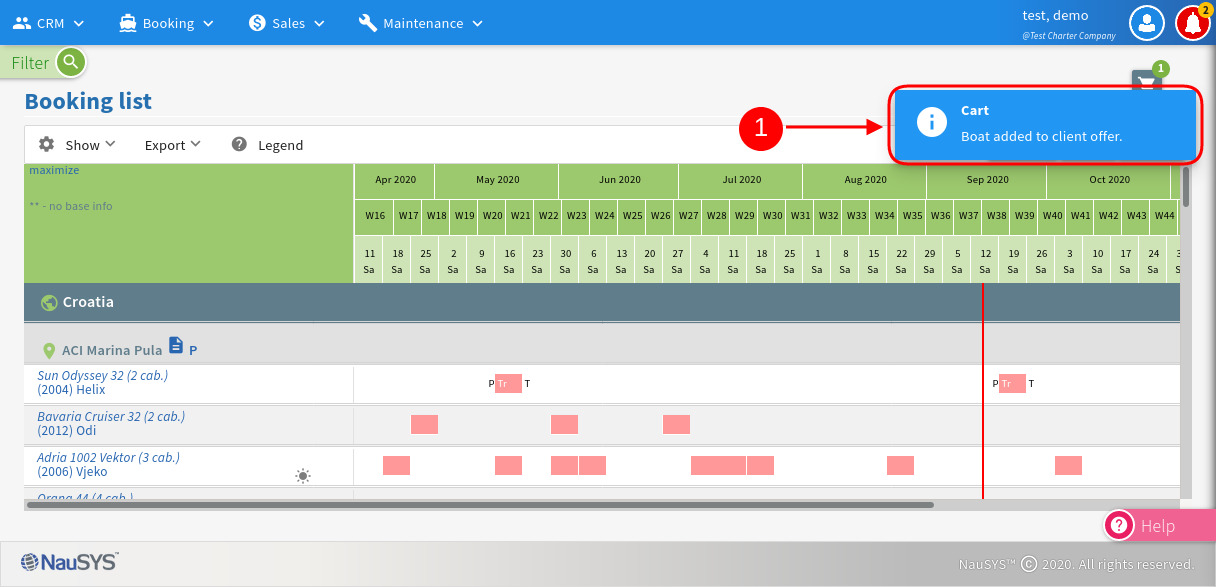
Picture 9.
To edit the number of boats in the offer, click on the cart icon in the top right corner. This will open up the edit dialog box (picture 10) where you can remove boats, create an offer or clear the entire list.
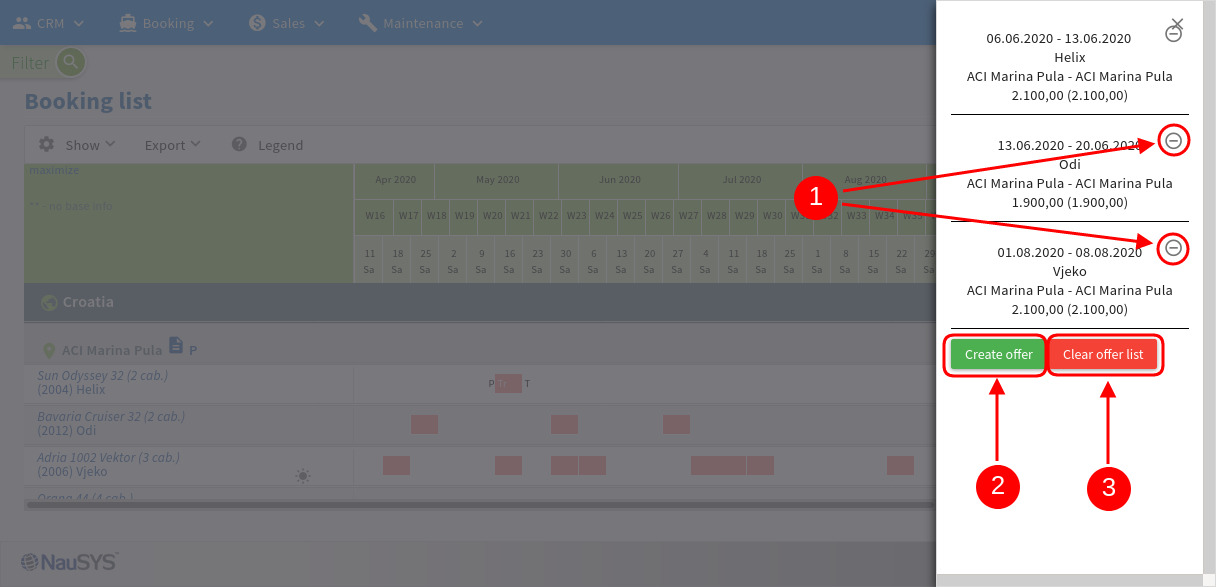
Picture 10.
If you choose to create a single boat Info, simply click on the create info button (2) (picture 8). This will open up the offer editor (picture 11).
Picture 11.
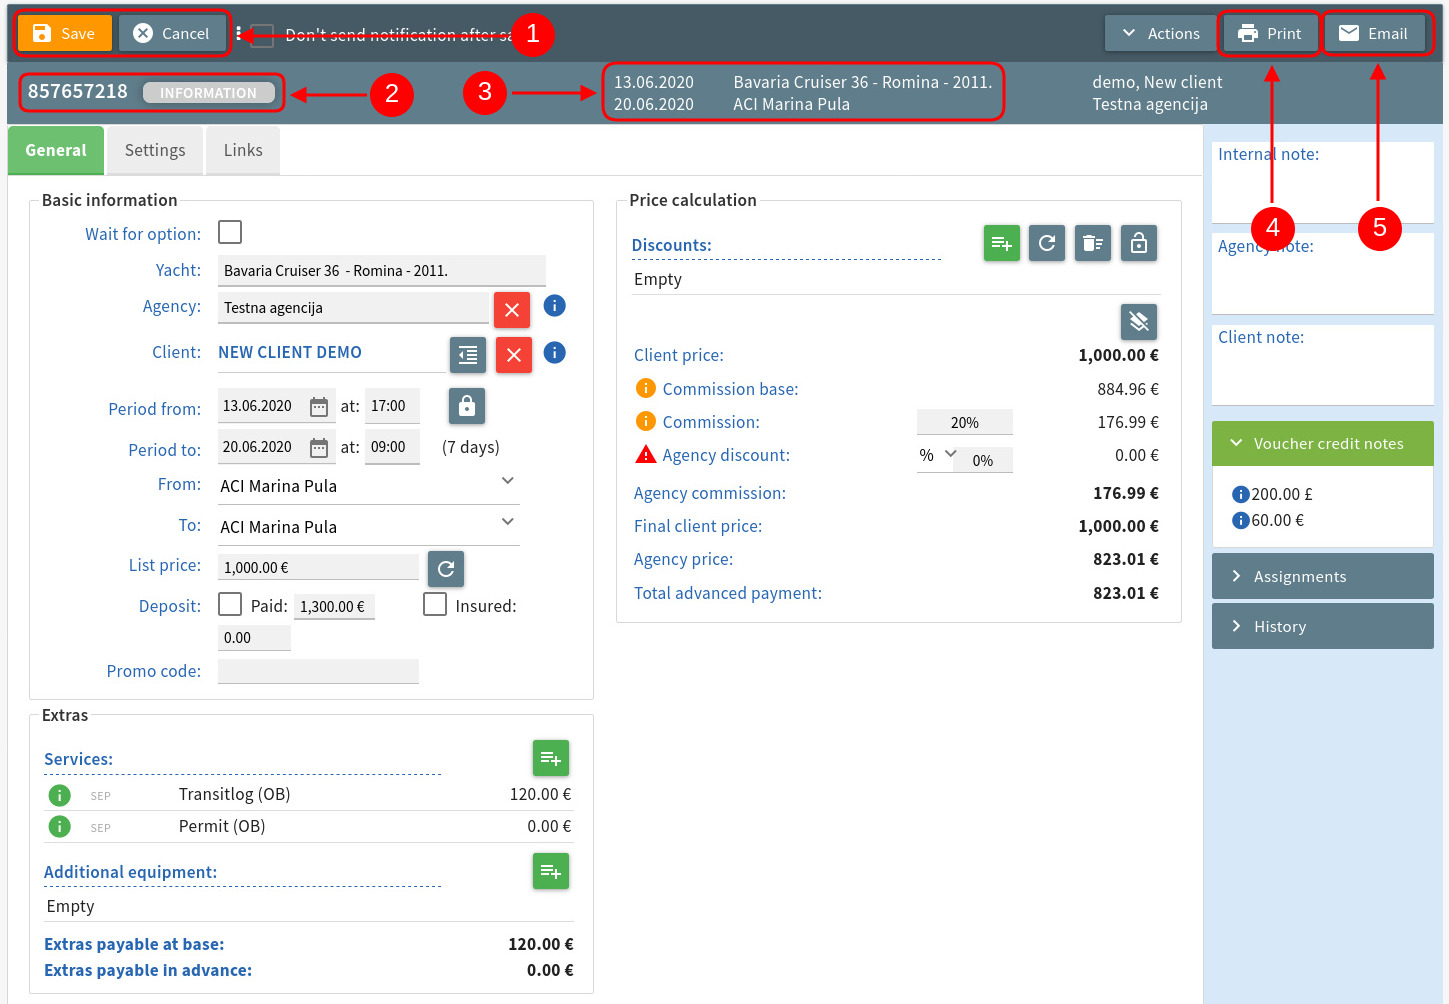
Save button (1) will save the changes made to the Info reservation and return to the Booking list.
Cancel button (1) will discard the changes made to the reservation and return to the Booking list.
On the information bar, the reservation number and type (2) will be displayed.
The booking period, boat name and charter base (3) can also be found here for reference.
You can also choose to Print (4) the reservation or Send (5)the Offer to the client via e-mail.
The most important information about the reservation can be found in the Basic information section (Picture 12).
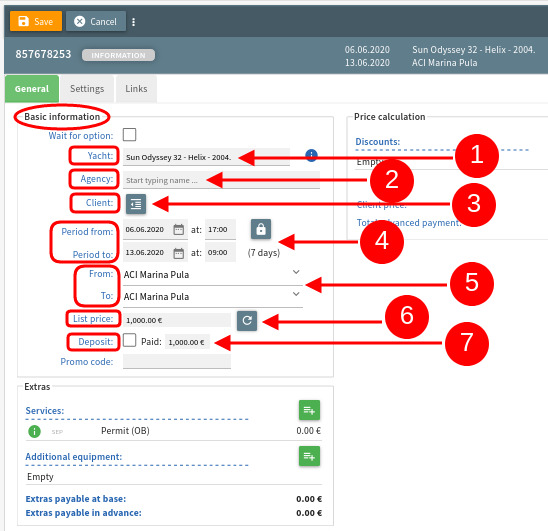
Picture 12.
(1) Yacht – displays the boat model, name and built year of the boat
(2) Agency – displays the Agency name linked to the reservation
(3) Client – displays the direct client name linked to the reservation
(4) Period from, Period to – displays the start and end dates of the reservation
(5) From, To – displays the starting and final charter base of the reservation
(6) List price – displays the price from the price list of the reservation
(7) Deposit – displays the refundable security deposit amount, if there is any.
All of these parameters can be changed manually if needed.
To change the Yacht on the reservation (picture 13), simply click on the name of the boat and start typing the name of the boat you wish to add (1).
A list will be presented (2) based on your entry. Simply click on the desired boat to add it to the reservation.
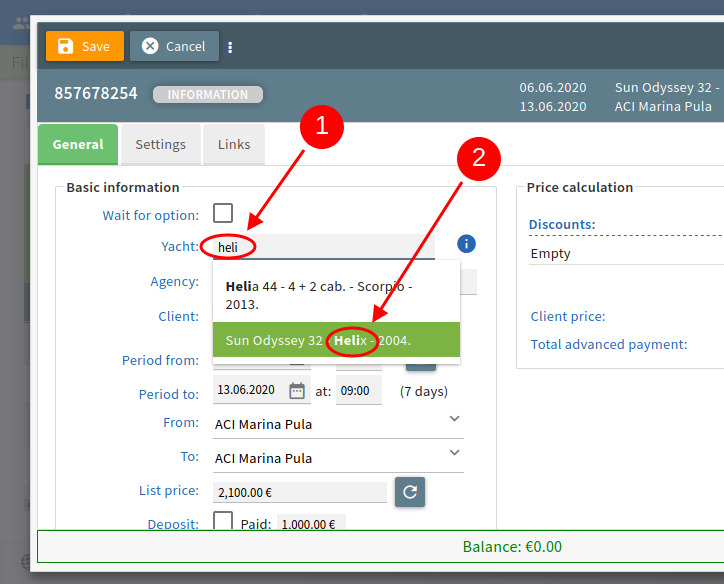
Picture 13.
To add/change the Agency on the reservation (picture 14), simply click on the text field to the right of the Agency label (1), and start typing the desired Agency name.
A list will be presented (2) based on your entry. Simply click on the the desired Agency from the list to add it to the reservation.
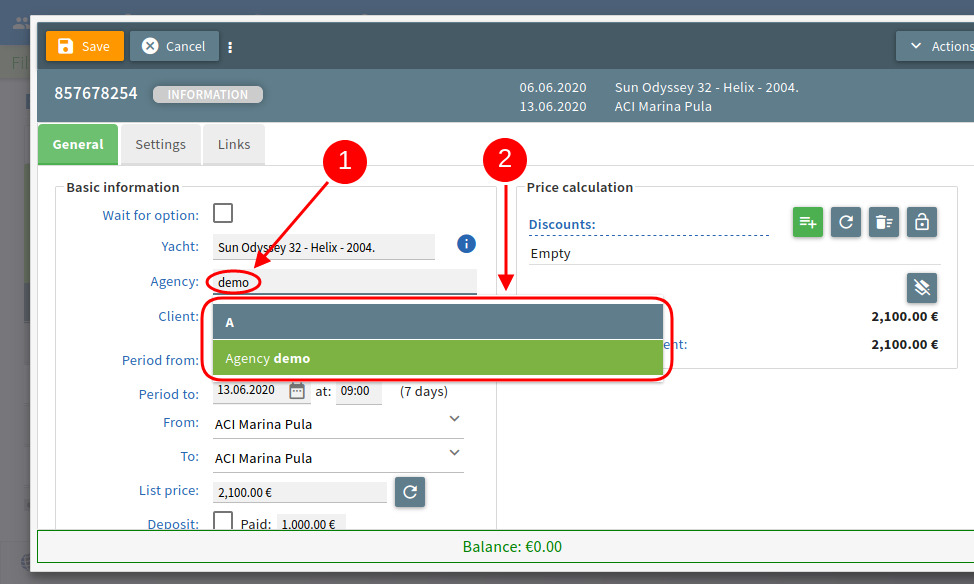
Picture 14.
To add/change a direct client on the reservation (picture 15), click on the icon (1) to the right of Client label.
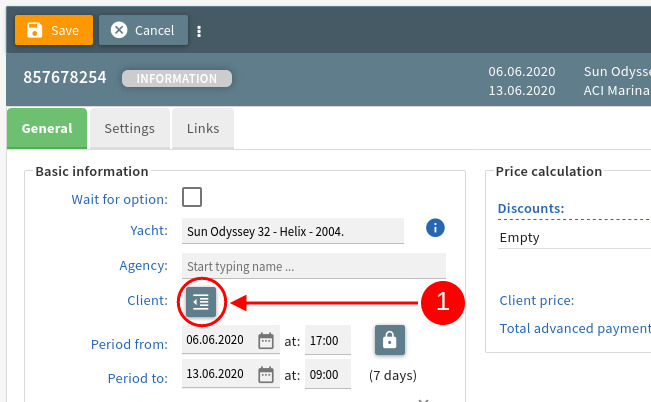
Picture 15.
This will open the CRM module (picture 16).
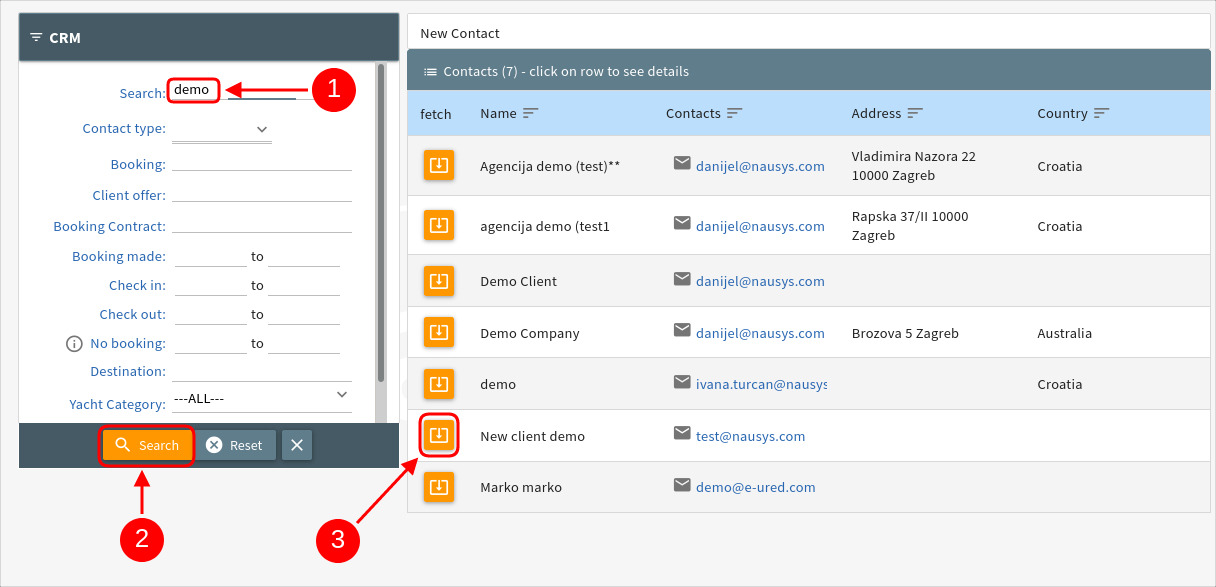
Picture 16.
To find a client, click on the Search text box (1), start typing the name of the client you wish to add, and click the Search button. This will display the desired clients in the right panel.
To select a client, simply click the Fetch icon (3) which is on the left side of the desired clients name.
For more information on hoe to work with the CRM module, please refer to the CRM manual.
This will add the client to the reservation and take you back to the reservation edit dialog (picture 17).
To delete an existing client, click the Delete icon (1).
To see more info of an existing client, click the Info icon (2).
This will open an information dialog (3).
To close the information dialog, click the Close icon (4).
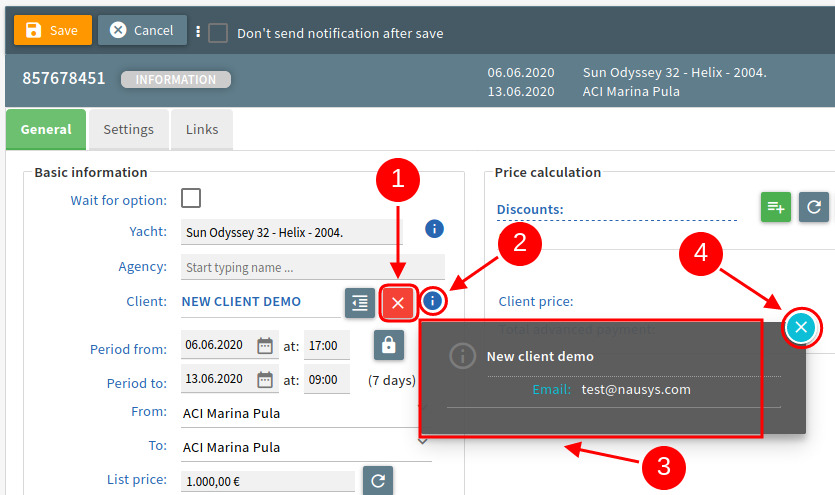
Picture 17.
Start (From) and end (To) dates (1) for the reservation can be changed by clicking on the corresponding (2) date fields (Picture 18).
This will open the date selection calendar (picture 19).
The system will offer the available dates to choose from (1).
Once a new date is selected, the system will automatically recalculate the final price.
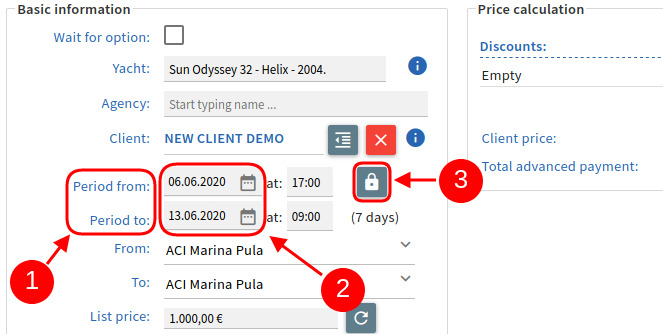
Picture 18.
If you wish to freely select any date without limitation, please click the Free calendar unlock icon (3).
This will allow you to choose any date on the calendar within the existing seasons.
! Note: When choosing a date with the unlocked calendar option, the system will not recalculate the final price automatically.
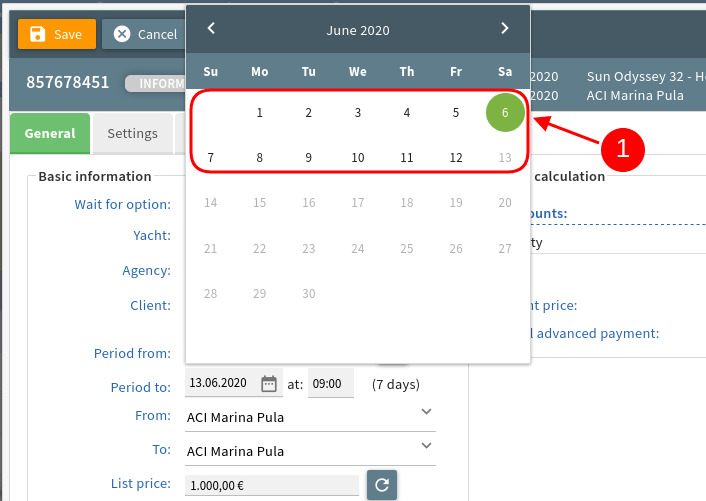
Picture 19.
Start (From) and final (To) Charter bases (1) for the reservation can also be changed (picture 20).
To change the base, click on the drop down menu to the right of the corresponding label (2), and then simply select the desired base from the drop down menu (3).
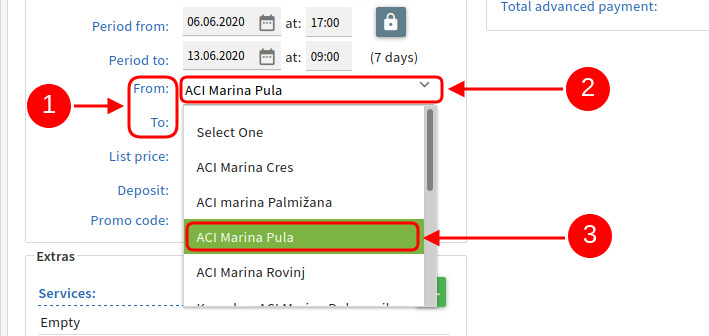
Picture 20.
List price (1) which is defined from the price list entered in the system can be changed by clicking on the Amount field (2) and entering the desired amount (picture 21). Once entered, the system will automatically recalculate the final price.
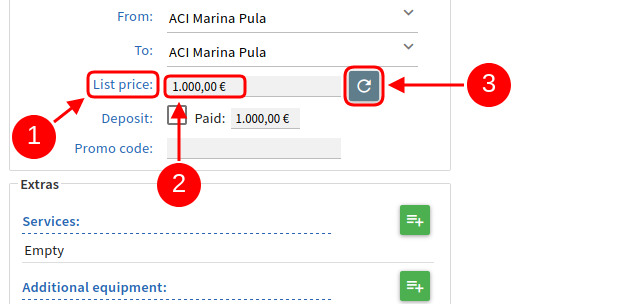
Picture 21.
Refundable Security deposit (1) can be changed by clicking on the Amount field (2) and entering the desired amount (picture 22).

Picture 22.
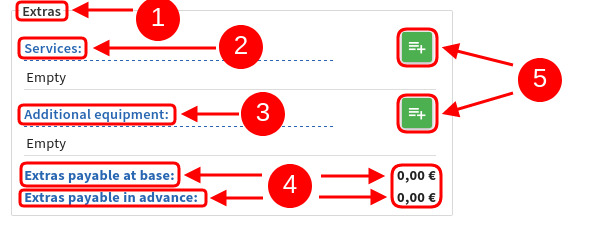
(1) Extras which are divided into Services (2) and Additional equipment (3), are visible below the Basic information (picture 23). Sum of the extras is displayed at the bottom (4).
Picture 23.
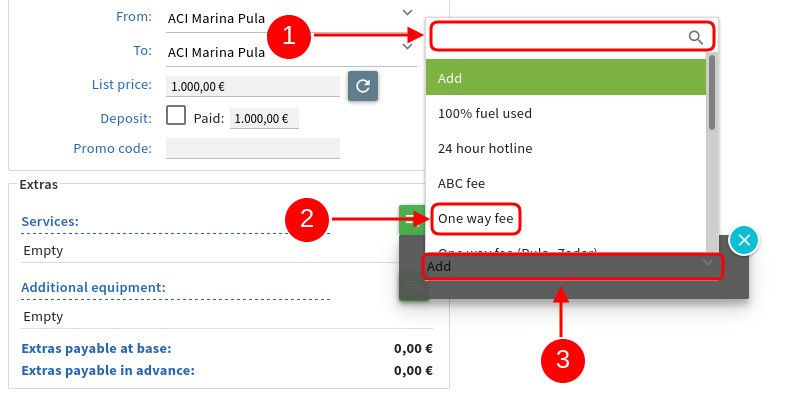
To add more Services (2) or Additional equipment (3), click on the Add (5) icon on the right side.
A new Add dialog will open (picture 24). Click on the Add dialog (1), and a Text search box (2) will open. Start typing to filter out the desired extras or just select the desired extra from the list. Once listed, simply click on the desired extra (3) to add it to the reservation.
Picture 24.
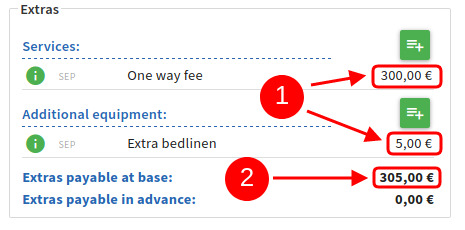
Once added, the extras (1) will be automatically calculated (3) in the reservation price (picture 25), depending if they are payable at base or in advance.
Picture 25.
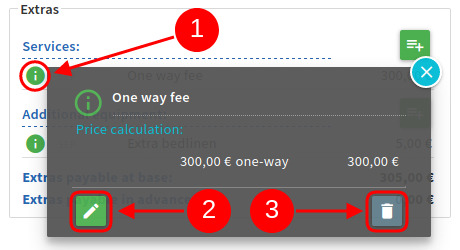
To see more information about an extra, click the Info icon (1), left of the extras name. This will open an Info dialog with additional information.
This also allows you to Delete (3), or Edit (2) the extra.
Picture 26.
If you select to edit an extra, a new dialog window will open (picture 27).

Picture 27.
Here you can edit the service/equipment item.
You can edit the Price (1), Quantity (2), Quantity measure (3) and the Calculation type (4).You can also mark if the extra has been Paid (6), and whether it is Obligatory (7).
Once done, you can either choose to Save or Cancel (8) the changes made.
These changes will be automatically recalculated by the system.
On the right of the Basic information, you will find the Price calculation section (picture 28).
This section contains the Discounts (1) and the Price calculation.
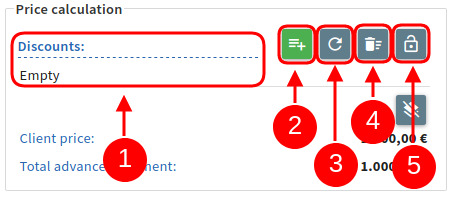
Picture 28.
There are 4 icons next to the Discounts.
Lock price and discount (5) – disables any changes to prices and discounts, and is automatically applied once a booking is confirmed.
Remove all (4) – removes all added discounts
Refresh discounts (3) – removes all added discounts and sets the default discounts
Add discount (2) – opens the add discount dialog
Add discount dialog (picture 29) is used to manually add discounts to a reservation.
You can choose between Regular or Extra discounts (1).
When chosen, you can add the desired discount from the drop down list (2).
Please note that you can also search the discount list by typing in the discount name.
Next choose the discount percentage or amount (3).
Percentage or a fixed amount is chosen via the drop down menu (4).
Finally, you can either close the dialog and discard the changes (6), or click the Add button (5) to add the discount.
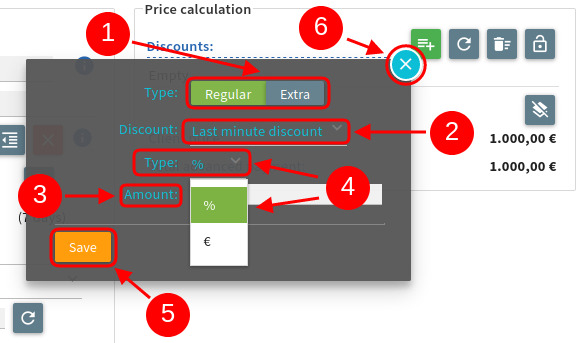
Picture 29.
Once the discount (1) is added (picture 30), the system will automatically recalculate the reservation price.
If you wish to see additional information, edit or remove an individual discount, you can do this by clicking the Information icon (2) left of the discount name.
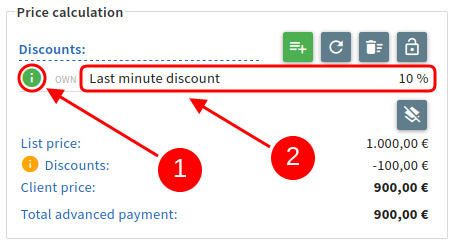
Picture 30.
This will open the information dialog (picture 31) with additional information where you can choose to simply Close the dialog (1), or to Remove (2) or Edit the discount (3).
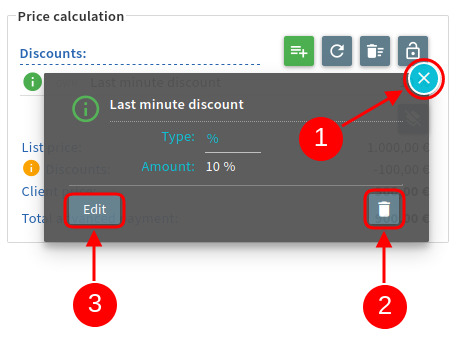
Picture 31.
If you choose to edit the discount, the edit dialog will open (picture 32).
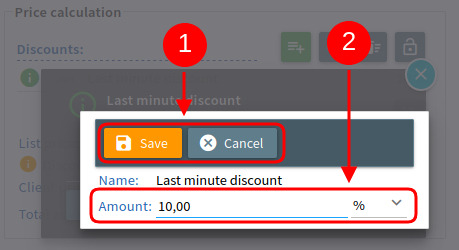
Picture 32.
The discount amount is entered in the Amount field (2).
Once done, you can choose to discard the changes by clicking the Cancel button, or save them by clicking the Save button (1).
After configuring all of the desired parameters on the reservation, you can see the final Price calculation (picture 33).
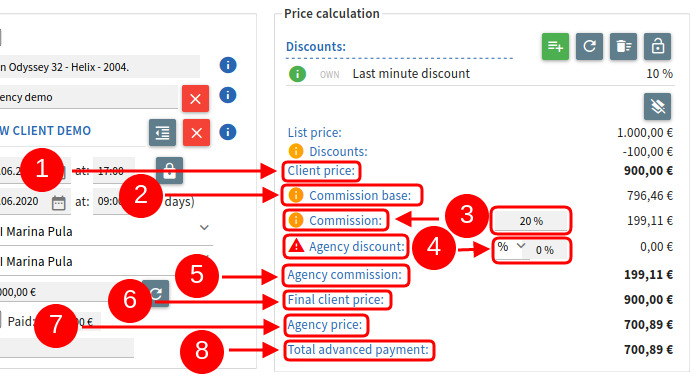
Picture 33.
Here you will have displayed all of the relevant information for the price calculation:
(1) Client price – list price after deducting discounts
(2) Commission base – base for calculating the Agency commission (with or without VAT depending on the country where the service is provided and the fleet operator). You can see more information on the calculation by hovering the mouse over the info icon.
(3) Commission – Agency commission percentage given from the Fleet operator. You can see more information on the calculation by hovering the mouse over the info icon.
(4) Agency discount – discount given to the client by the Agency in absolute amount or percentage. This discount will be deducted from the Agency commission. You can see more information by hovering the mouse over the notice icon.
(5) Agency commission – final Agency commission after all discounts have been calculated.
(6) Final client price – final price for the client after all discounts have been calculated
(7) Agency price – final price minus the Agency commission for the Agency after all discounts have been calculated
(8) Total advanced payment – final amount to be paid by the Agency to the Fleet operator without Agency commission, including extras if payable in advance.
To see the Nett values in the Price calculation also (picture 34), click the Show Nett values icon (1).
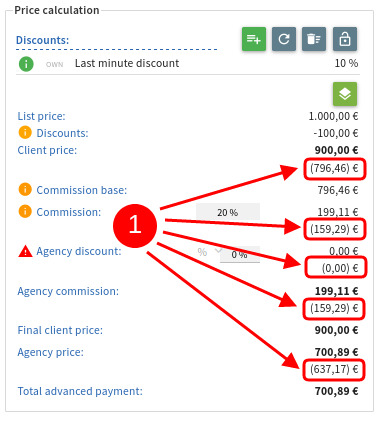
Picture 34.
Once you checked all the parameters of the reservation, you can choose to:
Discard the Info reservation by clicking on the Cancel button (1).
Save the offer by clicking the Save button (2).
Create an Option by selecting the Actions menu (3), and then clicking the Make option menu item (4).
Create a Booking by selecting the Actions menu (3), and then clicking the Make booking menu item (5).
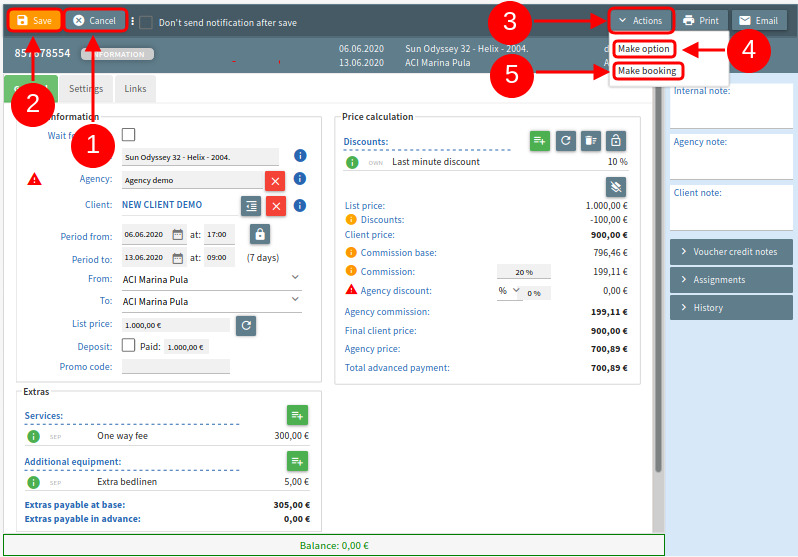
Picture 35.
Depending on your choice, the top info bar (left upper corner) will change to Option (picture 36) or Booking (picture 37) (1), along with the added Client (2) or Agency (right side)(3).
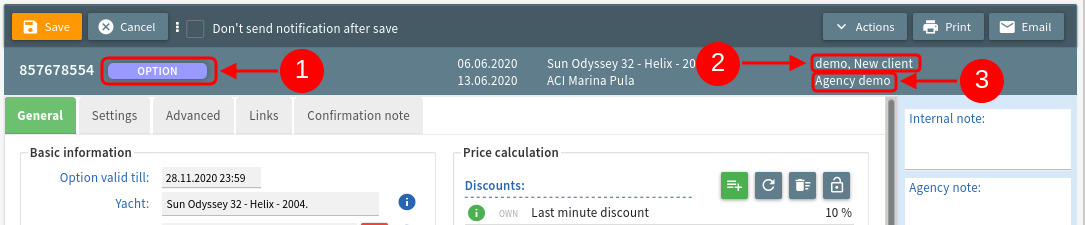
Picture 36.
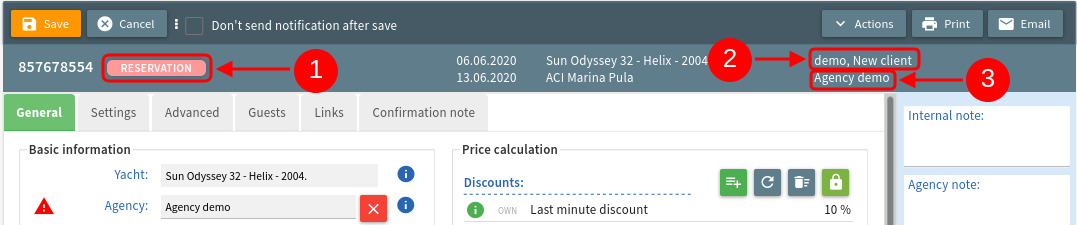
Picture 37.